OctoProctor system installation and upgrade Guide
1. System architecture
The architecture of the proctoring system is shown in the figure below.
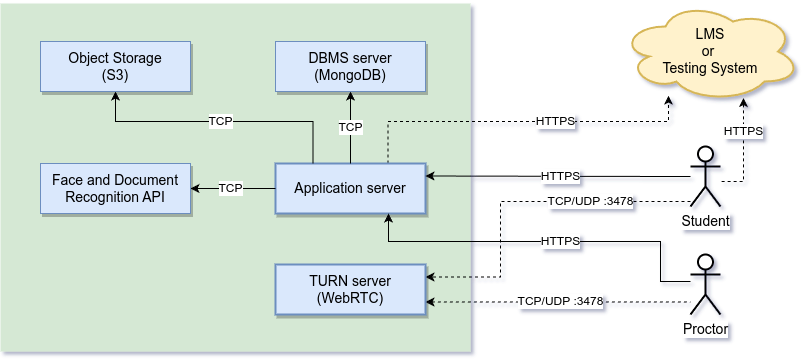
The server part consists of the following components:
- Application server — Node.js environment for launching server applications; a web server and the core of the proctoring system are launched in it.
- DBMS server — MongoDB database management system server, you can use your own server or cloud service with API support for MongoDB.
- File storage — AWS S3 compatible storage of downloaded files to the proctoring system; The bundled on-premise installation uses Silo, a community-maintained fork of the open-source MinIO server; you can also use your own S3-compatible server or a cloud service with a compatible API.
- TURN server — a server to support the operation of the video communication module via WebRTC, you can use your own server (for example, coturn)
- Face and Document Recognition API — facial recognition and document recognition software is part of the proctoring system.
Use the hardware calculator to calculate the computing power of the server based on the expected load.
The server part of the system requires an operating system (OS) based on a 64-bit Linux distribution. Ubuntu, Debian, CentOS or other similar distributions can be used. The proctoring system requires Docker software (software) or other environment to run Docker containers. However, you can use cloud services for DBMS server (MongoDB-compatible) and file storage (S3-compatible).
2. Running the system via Docker Compose
This is the preferred way to run the system on a single server.
2.1. Server preparation
This section of the instructions describes how to run all system components via Docker Compose (see Docker Compose installation instructions).
2.2. Preparing a configuration file
All settings for running proctoring components (containers) are written in the Docker Compose file (docker-compose.yml) and the environment variables file (.env). The script for launching containers is designed so that, for the specified domain (the DOMAIN_NAME variable), Certbot automatically issues an SSL certificate from Let's Encrypt for 90 days.
This is a typical docker-compose.yml file for running all containers:
services:
  node:
    depends_on:
      mongo:
        condition: service_healthy
      silo:
        condition: service_healthy
      recognizer:
        condition: service_healthy
    image: public.ecr.aws/s8z4o5f0/node:latest
    restart: always
    networks:
      - backend
    ports:
      - "0.0.0.0:80:80/tcp"
      - "0.0.0.0:443:443/tcp"
    volumes:
      - cert:/etc/letsencrypt
      - webroot:/var/www
    environment:
      DISTRIB_URL: ${DISTRIB_URL}
      DISTRIB_KEY: ${DISTRIB_KEY}
      MONGO_URI: mongodb://admin:${MONGO_SECRET:-secret}@mongo:27017/proctoring?authSource=admin
      S3_URI: http://minioadmin:${MINIO_SECRET:-minioadmin}@silo:9000/proctoring
      RECOGNIZER_URI: http://${RECOGNIZER_SECRET:-secret}@recognizer:8080/recognize
      TURN_URI: turn://webrtc:${TURN_SECRET:-webrtc}@${DOMAIN_NAME:-localhost}:3478?transport=udp+tcp
      SESSION_KEY: ${SESSION_KEY:-secret}
      #SSL_KEY: -----BEGIN RSA PRIVATE KEY-----\n...
      #SSL_CERT: -----BEGIN CERTIFICATE-----\n...
      SSL_KEY: /etc/letsencrypt/live/${DOMAIN_NAME:-localhost}/privkey.pem
      SSL_CERT: /etc/letsencrypt/live/${DOMAIN_NAME:-localhost}/cert.pem
      SSL_CA: /etc/letsencrypt/live/${DOMAIN_NAME:-localhost}/chain.pem
      PORT: 443
      HTTP_PORT: 80
      HTTP_WEBROOT: /var/www
      MANAGER_USERNAME: ${MANAGER_USERNAME:-manager}
      MANAGER_PASSWORD: ${MANAGER_PASSWORD:-ChangeMe12345}
      MANAGER_HOST: ${DOMAIN_NAME}
      PASSWORD_RULE: ${PASSWORD_RULE:-}
    healthcheck:
      test: [ "CMD", "curl", "-sS", "-m", "10", "http://127.0.0.1/ping" ]
  recognizer:
    image: public.ecr.aws/s8z4o5f0/recognizer:latest
    restart: always
    networks:
      - backend
    #ports:
    #  - "0.0.0.0:8080:8080/tcp"
    environment:
      PORT: 8080
      API_KEY: ${RECOGNIZER_SECRET:-secret}
    healthcheck:
      test: [ "CMD", "curl", "-sS", "-m", "10", "http://127.0.0.1:8080/ping" ]
  mongo:
    image: docker.io/library/mongo:8.0
    restart: always
    networks:
      - backend
    #ports:
    #  - "0.0.0.0:27017:27017/tcp"
    volumes:
      - db:/data/db
      - configdb:/data/configdb
    environment:
      MONGO_INITDB_ROOT_USERNAME: admin
      MONGO_INITDB_ROOT_PASSWORD: ${MONGO_SECRET:-secret}
    #command: mongod --replSet rs0 --keyFile /data/configdb/mongo.keyfile
    healthcheck:
      test: [ "CMD", "mongosh", "--eval", "db.adminCommand('ping')" ]
  silo:
    image: docker.io/pgsty/silo:latest
    restart: always
    networks:
      - backend
    #ports:
    #  - "0.0.0.0:9000:9000/tcp"
    #  - "0.0.0.0:9001:9001/tcp"
    volumes:
      - storage:/data
    environment:
      MINIO_ROOT_USER: minioadmin
      MINIO_ROOT_PASSWORD: ${MINIO_SECRET:-minioadmin}
    command: server /data --address ":9000" --console-address ":9001"
    healthcheck:
      test: [ "CMD", "curl", "-sS", "-m", "10", "http://127.0.0.1:9000/minio/health/live" ]
  turn:
    image: coturn/coturn:latest
    restart: always
    network_mode: host
    volumes:
      - turn:/var/lib/coturn
    environment:
      REAL_EXTERNAL_IP: ""
    command: --no-cli --log-file=stdout --lt-cred-mech --fingerprint --max-allocate-timeout=60 --listening-port=3478 --min-port=49152 --max-port=65535 --realm=${DOMAIN_NAME:-localhost} --user=webrtc:${TURN_SECRET:-webrtc} --external-ip=$(detect-external-ip)
  certbot:
    image: certbot/certbot:latest
    network_mode: host
    depends_on:
      node:
        condition: service_healthy
    volumes:
      - cert:/etc/letsencrypt
      - webroot:/var/www
    command: certonly --agree-tos --keep-until-expiring --webroot --webroot-path=/var/www --email=admin@${DOMAIN_NAME:-localhost} --no-eff-email --domains=${DOMAIN_NAME:-localhost}
networks:
  backend:
volumes:
  db:
  configdb:
  storage:
  turn:
  cert:
  webroot:
The .env file contains environment variables in the format VARIABLE=VALUE, which are described in the table below:
| Parameter | Description |
|---|---|
DISTRIB_URL |
Distribution archive URL (issued by supplier) |
DISTRIB_KEY |
Distribution archive password (issued by supplier) |
DOMAIN_NAME |
Server public domain |
MONGO_SECRET |
MongoDB database password for admin |
MINIO_SECRET |
Silo storage password |
TURN_SECRET |
Password to connect to the TURN server |
RECOGNIZER_SECRET |
Recognition API access key |
SESSION_KEY |
Session secret key |
MANAGER_USERNAME |
Manager username |
MANAGER_PASSWORD |
Manager user password |
PASSWORD_RULE |
'^(?=.*[0-9])(?=.*[a-z])(?=.*[A-Z]).{12,}$' |
WARNING: Environment variables
MONGO_SECRET,MINIO_SECRET,TURN_SECRETandRECOGNIZER_SECRETmust not contain special characters, only the following characters are allowed:a-zA-Z0-9All user passwords must follow
PASSWORD_RULE: at least 12 characters, including at least one uppercase letter, one lowercase letter, and one number.
2.3. Launching containers
You can create and run all containers at once with the following command from the directory where the docker-compose.yml file is located:
docker compose up -d
2.4. Stopping containers
You can stop and remove all containers at once with the following command from the directory where the docker-compose.yml file is located:
docker compose down
3. Running the system via Docker CLI
You can use this method to manage Docker containers more flexibly without using Docker Compose.
3.1. Server preparation
This section of the manual describes how to run all system components in Docker (see Docker installation instructions).
3.2. MongoDB server
3.2.1. Single server
Create a volume on the host where the database files will be stored:
docker volume create db
docker volume create configdb
Run container mongo:
docker run -d --name mongo --network host --restart always \
  -v db:/data/db \
  -v configdb:/data/configdb \
  -e "MONGO_INITDB_ROOT_USERNAME=admin" \
  -e "MONGO_INITDB_ROOT_PASSWORD=secret" \
  mongo:8.0
Environment variables (set in the -e parameter):
# database administrator login
MONGO_INITDB_ROOT_USERNAME=admin
# database administrator password
MONGO_INITDB_ROOT_PASSWORD=secret
DB connection string:
mongodb://admin:secret@127.0.0.1:27017/proctoring?authSource=admin
3.2.2. Cluster configuration
Create volumes on the host in which the database files and configs will be stored:
docker volume create db
docker volume create configdb
For MongoDB, the cluster configuration is configured using the Replica Set as one Primary node and one or more Secondary nodes. In order for the nodes of the MongoDB cluster to communicate with each other, the same key must be registered on all cluster nodes. You can generate a key with the command:
KEYFILE=/var/lib/docker/volumes/configdb/_data/mongo.keyfile
if [ ! -e "$KEYFILE" ]
then
  openssl rand -base64 756 | tee $KEYFILE
  chmod 400 $KEYFILE
fi
Run a "mongo" container on a replica named "rs0" on each host (for example, "mongodb01" and "mongodb02"):
docker run -d --name mongo --network host --restart always \
  -v db:/data/db \
  -v configdb:/data/configdb \
  -e "MONGO_INITDB_ROOT_USERNAME=admin" \
  -e "MONGO_INITDB_ROOT_PASSWORD=secret" \
  mongo:8.0 \
  mongod --replSet rs0 --keyFile /data/configdb/mongo.keyfile
Environment variables (set in the -e parameter):
# database administrator login
MONGO_INITDB_ROOT_USERNAME=admin
# database administrator password
MONGO_INITDB_ROOT_PASSWORD=secret
Command parameters:
# name of replica set
--replSet rs0
# path to the replica key file
--keyFile /data/configdb/mongo.keyfile
Initialize the cluster with the command:
docker exec -it mongo mongosh -u admin -p secret --authenticationDatabase admin

> rs.initiate(
  {
    _id: "rs0",
    version: 1,
    members: [
      { _id: 0, host: "mongodb01:27017" },
      { _id: 1, host: "mongodb02:27017" }
    ]
  }
)
DB connection string:
mongodb://admin:secret@mongodb01:27017,mongodb02:27017/proctoring?authSource=admin&replicaSet=rs0
3.3. File storage
3.3.1. Local storage Silo
Create a volume on the host where the repository files will be stored:
docker volume create storage
Run container minio:
docker run -d --name silo --network host --restart always \
  -v "storage:/data" \
  -e "MINIO_ROOT_USER=minioadmin" \
  -e "MINIO_ROOT_PASSWORD=minioadmin" \
  docker.io/pgsty/silo:latest \
  server /data --address ":9000" --console-address ":9001"
Environment variables (set in the -e parameter):
# login to access the storage
MINIO_ROOT_USER=minioadmin
# password to access the storage
MINIO_ROOT_PASSWORD=minioadmin
Command parameters:
# listening port
--address ":9000"
# port for console
--console-address ":9001"
Storage connection string:
http://minioadmin:minioadmin@127.0.0.1:9000/proctoring
3.3.2. Silo storage tiers
When storing large amounts of data, in some cases it may be worthwhile to configure two data storage tiers: "hot" storage and "cold" storage. This allows you to use a small amount of "hot" storage with fast disks to ensure correct operation of the system under heavy load, and store archived data in "cold" storage on slower and cheaper disks. At the same time, set up a rule for automatically moving data from "hot" storage to "cold" storage, for example, after 1 day, without losing access to this data through the proctoring system.
Below are step-by-step instructions on how to configure two Silo servers with automatic data transition according to the rule from one server to another:
- Launch two Silo servers. Let it be minio1 (port 9000, on fast disks) and minio2 (port 9100, on slow disks).
- Download Silo Client (mc).
-
Configure mc to interact with the minio1 server:
mc alias set minio1 http://127.0.0.1:9000 <user> <password>
mc alias set minio2 http://127.0.0.1:9100 <user> <password>
where
<user>and<password>are storage access keys. -
Create buckets on both hot and cold storage:
mc mb minio1/proctoring mc mb minio2/proctoring -
Create Lifecycle and Tier Management Policy:
cat > lifecycle-policy.json << 'EOF' { "Version": "2012-10-17", "Statement": [ { "Effect": "Allow", "Action": [ "s3:GetLifecycleConfiguration", "s3:PutLifecycleConfiguration", "s3:ListBucket" ], "Resource": ["arn:aws:s3:::proctoring"] }, { "Effect": "Allow", "Action": [ "admin:SetTier", "admin:ListTier" ], "Resource": ["arn:aws:s3:::proctoring"] } ] } EOF -
Configure Lifecycle and Tier Management Policy:
mc admin policy create minio1 LifecycleAdminPolicy lifecycle-policy.json
mc admin user add minio1 <minio1LifecycleAdmin> <LongRandomSecretKey>
mc admin policy attach minio1 LifecycleAdminPolicy --user=minio1LifecycleAdmin
where
<minio1LifecycleAdmin>is the policy administrator login,<LongRandomSecretKey>is the policy administrator password. -
Configure remote storage tier:
mc ilm tier add minio minio1 MINIO_COLD_TIER \
  --endpoint http://127.0.0.1:9100 \
  --access-key <user> \
  --secret-key <password> \
  --bucket proctoring \
  --storage-class STANDARD
where
<user>and<password>are access keys to the second MinIO server,proctoringis the name of the bucket,http://127.0.0.1:9100is the address of the second MinIO server. -
Create and apply the transition rule (1 day after files are uploaded) with the name "MINIO_COLD_TIER":
mc ilm rule add minio1/proctoring \ --transition-tier MINIO_COLD_TIER \ --transition-days 1 \ --noncurrent-transition-tier MINIO_COLD_TIER \ --noncurrent-transition-days 1 -
Check the transition rule:
mc ilm rule ls minio1/proctoring --transition
You can read more about setting up storage levels and transfer rules in the official Silo documentation.
3.3.3. Amazon S3
You can use Amazon S3 as storage, you don't need to install anything extra for this. Storage connection string ("proctoring" bucket):
https://access_key_id:secret_key@s3.eu-west-1.amazonaws.com/proctoring?region=eu-west-1
NOTE:
eu-west-1should be your S3 region that you really use;access_key_idandsecret_keycan only be uppercase or lowercase Latin characters and numbers, if not regenerate it;proctoringis a bucket name in S3 that must be created before.
3.4. Face and Document Recognition API
Run container recognizer:
docker run -d --name recognizer \
  --network host --restart always \
  -e "API_KEY=secret" \
  public.ecr.aws/s8z4o5f0/recognizer:latest
Environment variables (set in the -e parameter):
# server IP
HOST=0.0.0.0
# server port
PORT=8080
# number of workers (auto if not set)
THREADS=4
# API access key
API_KEY=secret
# flag for rebuilding if the processor
# does not support AVX instructions
DLIB_REBUILD=1
Recognition API connection string:
http://secret@127.0.0.1:8080/recognize
Recognition API connection string for multiple servers (for example "recognizer01" and "recognizer02"):
http://secret@recognizer01:8080,recognizer02:8080/recognize
3.5. TURN server
Run container turn:
docker run -d --name turn --network host --restart always \
  coturn/coturn:latest \
  --no-cli --log-file=stdout --lt-cred-mech --fingerprint \
  --max-allocate-timeout=60 --listening-port=3478 --min-port=49152 --max-port=65535 \
  --user=webrtc:webrtc --realm=proctoring --external-ip='$(detect-external-ip)'
Ports used (should be available from clients):
3478/tcp3478/udp49152-65535/udp(optional)
Command parameters:
# TURN server port
--listening-port=3478
# range of UDP ports
--min-port=49152
--max-port=65535
# user credentials as <username>:<password>
--user=webrtc:webrtc
# external IP address (or determine automatically)
--external-ip='$(detect-external-ip)'
TURN connection string:
turn://webrtc:webrtc@<external-ip>:3478?transport=tcp+udp
where <external-ip> is the external IP address of TURN server, if there are several servers, their addresses should be separated by comma; webrtc:webrtc is the default username and password to connect to TURN; 3478 is the port of TURN server; transport is the used transport tcp or udp, tcp+udp indicates the need to use both transports.
To check the operation of the TURN server in the browser we can use the Trickle ICE page. To do this you need to enter the connection parameters to the server on this page:
- TURN URI:
turn:<external-ip>:3478?transport=udp - TURN username:
webrtc - TURN password:
webrtc
Then click on "Add Server" and "Gather candidates". As a result, the table on this page should list the following connection types in the "Component Type" field:
host— client's local IP address;srflx— external IP address of the client;relay— external IP address of the TURN server, must match<external-ip>.
If at least one type is not on the list, the access to the TURN server is configured incorrectly. Check if the connections are not blocked by the firewall or intermediate routers in the network.
If the TURN check fails, then the reason may be blocking UDP traffic between the client and the server. You can check the transmission of UDP traffic between clients and the server on a specific port using the following commands:
Server
nc -u -l -p <udp-port>
Client
echo -n "ping" | nc -u -w 5 <external-ip> <udp-port>
3.6. Application server
3.6.1. Let's Encrypt SSL certificate
The system requires a valid SSL certificate for the domain. You can issue a free Let's Encrypt SSL certificate valid for 3 months. To do this, just use the Certbot tool:
docker volume create cert
docker volume create webroot
docker run --network host \
  -v "cert:/etc/letsencrypt" \
  -v "webroot:/var/www" \
  certbot/certbot:latest \
  certonly --agree-tos --keep-until-expiring \
  --webroot --webroot-path=/var/www \
  --email=admin@<your-domain> --no-eff-email \
  --domains=<your-domain>
After successful execution of the command, the certificate will be available in the /etc/letsencrypt/live/<your-domain>/ directory:
- certificate:
cert.pem - chain:
chain.pem - private key:
privkey.pem
In this example, Certbot uses a webroot directory to share the files required for the HTTP challenge. This means that you need to start the application server first. Alternatively, you can run Certbot in standalone mode (use --standalone parameter instead of --webroot), which runs an internal web server.
3.6.2. Running instance
The application server instance must be bound to a single domain, and a license will be issued for that domain. The application server can be run on one node or multiple nodes (horizontal scaling). When running the application server on multiple nodes, all instances must have the same parameters specified in the environment variables.
Start the container node:
docker run -d --name node --network host --restart always \
  --tmpfs /tmp \
  -v "cert:/etc/letsencrypt" \
  -v "webroot:/var/www" \
  -e "DISTRIB_URL=https://files.proctoring.app/dist/proctoring-vXYZ.zip" \
  -e "DISTRIB_KEY=secret" \
  -e "MONGO_URI=mongodb://admin:secret@127.0.0.1:27017/proctoring?authSource=admin" \
  -e "S3_URI=http://minioadmin:minioadmin@127.0.0.1:9000/proctoring" \
  -e "RECOGNIZER_URI=http://secret@127.0.0.1:8080/recognize" \
  -e "TURN_URI=turn://webrtc:webrtc@<external-ip>:3478?transport=tcp+udp" \
  -e "SESSION_KEY=secret" \
  -e "SSL_KEY=/etc/letsencrypt/live/<your-domain>/privkey.pem" \
  -e "SSL_CERT=/etc/letsencrypt/live/<your-domain>/cert.pem" \
  -e "SSL_CA=/etc/letsencrypt/live/<your-domain>/chain.pem" \
  -e "PORT=443" \
  -e "HTTP_PORT=80" \
  -e "HTTP_WEBROOT=/var/www" \
  -e "MANAGER_USERNAME=manager" \
  -e "MANAGER_PASSWORD=ChangeMe12345" \
  -e "MANAGER_HOST=<your-domain>" \
  public.ecr.aws/s8z4o5f0/node:latest
Environment variables (set in the -e parameter):
# proctoring system distribution kit URL
DISTRIB_URL=https://files.proctoring.app/dist/proctoring-vX_Y_Z.zip
# distribution kit password (issued separately)
DISTRIB_KEY=secret
# server IP
HOST=0.0.0.0
# server port
PORT=443
# port forwarding from http to https
HTTP_PORT=80
# server response timeout
HTTP_TIMEOUT=60
# directory for /.well-known/acme-challenge
HTTP_WEBROOT=/var/www
# number of threads, by default equal to the number of vCPUs
THREADS=4
# MongoDB connection string
MONGO_URI=mongodb://admin:secret@127.0.0.1:27017/proctoring?authSource=admin
# S3 storage connection string
S3_URI=http://minioadmin:minioadmin@127.0.0.1:9000/proctoring
# recognition API connection string
RECOGNIZER_URI=http://secret@127.0.0.1:8080/recognize
# TURN Server connection string
TURN_URI=turn://webrtc:webrtc@<external-ip>:3478?transport=tcp+udp
# secret key for sessions (random character set)
SESSION_KEY=secret
# session lifetime in minutes
SESSION_EXPIRES=180
# private key (content or file path)
SSL_KEY=/etc/letsencrypt/live/<your-domain>/privkey.pem
# SSL certificate (content or file path)
SSL_CERT=/etc/letsencrypt/live/<your-domain>/cert.pem
# certification authority bundle (content or file path)
SSL_CA=/etc/letsencrypt/live/<your-domain>/chain.pem
# limit on the size of uploaded files in MiB
UPLOAD_LIMIT=100
# storage time of unused downloaded files in minutes
UPLOAD_EXPIRES=60
# time of caching statics on the client in minutes
STATIC_EXPIRES=60
# directory of static files
STATIC_DIR=/path/to/dir
# manager login
MANAGER_USERNAME=manager
# manager password
MANAGER_PASSWORD=ChangeMe12345
# host (and port, if non-standard) to login under the manager role
MANAGER_HOST=<your-domain>
# password complexity with a regular expression
# minimum 12 chars, at least one uppercase, one lowercase, one number
PASSWORD_RULE=^(?=.*[0-9])(?=.*[a-z])(?=.*[A-Z]).{12,}$
# number of unsuccessful authentication attempts
PASSWORD_ATTEMPTS=5
# lock account after maximum login attempts for N minutes
PASSWORD_HOLDOFF=5
# maximum depth of old password history for checking used passwords
PASSWORD_HISTORY=5
Note that you should replace the <your-domain> string with your actual domain name.
4. Setting up a reverse proxy
Usually the following settings are not required. However, if you are already using a reverse proxy server, you may need to configure the proctoring system to work through it.
4.1. Installing and configuring Nginx
Access to the system from the Internet can be configured through the proxy server Nginx, you can install it in Ubuntu as follows:
sudo apt-get install -y nginx
Virtual host configuration in nginx:
location / {
    client_max_body_size 100m;
    proxy_pass http://127.0.0.1:3000;
    proxy_redirect off;
    proxy_http_version 1.1;
    proxy_pass_request_headers on;
    proxy_set_header Host $host;
    proxy_set_header Origin $http_origin;
    proxy_set_header Upgrade $http_upgrade;
    proxy_set_header Connection "upgrade";
    proxy_set_header Authorization $http_authorization;
    proxy_set_header X-Forwarded-For $proxy_add_x_forwarded_for;
    proxy_set_header X-Forwarded-By $server_addr:$server_port;
    proxy_set_header X-Forwarded-Proto $scheme;
}
4.2. Installing and configuring Apache
Installing Apache Web Server on Ubuntu:
sudo apt-get install -y apache2
Apache 2.4 virtual host configuration:
RewriteEngine On
RewriteCond %{REQUEST_URI}  ^/ws                   [NC]
RewriteRule /(.*)           ws://127.0.0.1:3000/$1 [P,L]
<Location "/">
    # RequestHeader set Host "your-proctoring-domain"
    ProxyPreserveHost On
    ProxyPass "http://127.0.0.1:3000/"
    ProxyPassReverse "http://127.0.0.1:3000/"
</Location>
Apache must have mod_proxy, mod_proxy_http, mod_proxy_wstunnel, and mod_rewrite modules enabled.
5. System upgrade
Below are the actions that you have to perform consistently to update the version of the proctoring system. It is not always necessary to update all components. If only the application server has been updated, then it is sufficient to update only the "node" container.
5.1. Upgrade notes
Keep in mind that upgrading individual system components may require additional migration actions.
5.1.1. Upgrade MongoDB
Before upgrading to the next version of MongoDB, you should change the compatibility version in your database:
-
Connect to database by client (e.g.
mongosh)docker exec -it mongo mongosh -u admin -p secret --authenticationDatabase admin -
To set or update "featureCompatibilityVersion", run the following command:
db.adminCommand( { setFeatureCompatibilityVersion: "5.0" } )
See more details in the official upgrade guide.
5.1.2. Switching file storage to Silo (OctoProctor v. 5.13.0)
This applies only to installations created before version 5.13.0, which use the minio/minio image for file storage. These images have been removed from Docker Hub, so such an installation cannot be reinstalled or upgraded with its old configuration.
To switch to Silo, replace your docker-compose.yml with the file from Section 2.2:
- Make sure that all passwords and keys are set in the
.envfile. If your currentdocker-compose.ymlcontains them directly, move them to.envfirst. - Place the new
docker-compose.ymlin the same directory as the old one. This keeps your existing data volumes. - Transfer any changes you made to the old file yourself, such as additional ports or environment variables.
- Start the new version with the
--remove-orphansparameter (see Section 5.5) to remove the oldminiocontainer.
Silo is a community-maintained fork of MinIO: it serves your existing storage volume in place, so no data migration is required.
5.1.3. Upgrade Recognizer
You should use the "latest" tag of the Recognizer Docker image public.ecr.aws/s8z4o5f0/recognizer:latest with the proctoring system v4.13 and higher. For older versions you should use the "old" tag.
5.2. Database backup
To back up the database:
docker exec <mongo_container> mongodump -u <user> -p <password> \
  --authenticationDatabase admin -d <db> --archive --gzip > /path/to/backup/db.dump
where <mongo_container> is the name of the "mongo" container, which can be viewed using the command docker ps; <user> is the username of the database user; <password> is the DB user password; <db> is the name of the database ("proctoring" by default); /path/to/backup/db.dump is the dump file.
If the mongo image has not been updated, then this step is not necessary.
5.3. File storage backup
To back up the file storage:
wget -qO- <mc_archive_url> | tar -xz -O mcli > /usr/local/bin/mc
chmod +x /usr/local/bin/mc
mc alias set local http://127.0.0.1:9000 <access_key> <access_secret>
mc mirror local/proctoring /path/to/backup/s3
where <mc_archive_url> is the link to the latest client archive for your platform (for example, mcli_..._linux_amd64.tar.gz) from the Silo Client releases page; <access_key> is the storage access key; <access_secret> is the storage access password; proctoring is the name of the proctoring bucket; /path/to/backup/s3 is the directory for saving the storage backup.
5.4. Uninstalling a previous version
Stop and remove all containers, remove all images:
docker compose down
5.5. Installing a new version
Start a new installation:
docker compose up -d --force-recreate --pull always --remove-orphans
5.6. Reading logs
Read the specified container log:
docker logs -f <container_name>
where <container_name> is the name of the container, which can be viewed using the command docker ps.
5.7. Database recovery
To restore the database:
cat /path/to/backup/db.dump | docker exec -i <mongo_container> mongorestore \
  -u <user> -p <password> --authenticationDatabase admin --archive --gzip
where <mongo_container> is the name of the "mongo" container, which can be viewed using the command docker ps; <user> is the DB user login; <password> is the DB user password; /path/to/backup/db.dump is the dump file.
If you have not made a backup copy of the database, then this step should be skipped.
5.8. File storage recovery
To restore the file storage data:
mc alias set local http://127.0.0.1:9000 <access_key> <access_secret>
mc mirror /path/to/backup/s3/ local/proctoring
where <access_key> is the storage access key; <access_secret> is the storage access password; proctoring is the name of the proctoring bucket; /path/to/backup/s3/ is the directory for saving the storage backup.
If you have not made a backup copy of the file storage, then this step should be skipped.
6. Log in
The system can be accessed at the address specified during deployment (for example, https://your-domain). Authorization parameters for the manager by default are as follows:
- login:
manager - password:
ChangeMe12345
After the first login under the manager, you need to add a host configuration based on a license key that is issued by supplier for a specific domain, term and volume.