Frequently Asked Questions
1. Supported browser versions
Supported browser versions for PC:
- Chrome 92+ (Windows 7+, macOS 10.13+, Linux, Chrome OS)
- Edge 90+ (Windows 7+)
- Firefox 85+ (Windows 7+, Linux)
- Opera 90+ (Windows 7+, Linux)
- Safari 14.1+ (macOS 10.13+)
Supported browser versions for smartphones:
2. Checking your computer for compatibility
You can take a practice proctored quiz here: https://octoproctor.com/demo
Computer test page: https://octoproctor.com/check
Individual test pages can also be set up to check the settings for specific assessments.
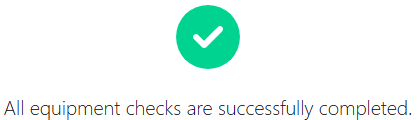
We recommend that you check your computer before the assessment starts so that you can make the necessary computer settings in advance. If the check is successful, the corresponding message is displayed.
3. Error "Your browser is not supported" during equipment check
Please, make sure you use supported equipment and software for the proctoring session. Technical requirements and useful links can be found in our Test-takers guide.
If all the requirements are met, the error may mean the system can't access your device's graphics card through WebGL, that is needed for the system check and platform to work properly.
Common causes:
- Graphics drivers are missing/outdated
- Hardware acceleration is turned off in the browser
- WebGL is disabled
Quick Fix Steps:
1. Update your graphics drivers
Install the latest official drivers for your graphics card from an official provider website (NVIDIA, AMD, Intel)
2. Enable hardware acceleration & WebGL in your browser
2.1. Google Chrome
- In the address bar, type:
chrome://settings/system→ Enter - Turn ON "Use graphics acceleration when available"
- Relaunch Chrome
- Optional check: type
chrome://gpu→ look under "Graphics Feature Status" → WebGL should say Hardware accelerated
2.2. Microsoft Edge
- In the address bar, type:
edge://settings/system→ Enter - Turn ON "Use hardware acceleration when available"
- Click Restart if prompted
2.3. Mozilla Firefox
- Go to Settings → General → scroll to Performance
- Check "Use recommended performance settings" (or uncheck it and manually enable "Use hardware acceleration when available")
- Advanced check: type
about:config→ accept the risk → search forwebgl.disabled→ Value must be false (if true → double-click to toggle)
2.4. Safari (macOS)
WebGL is normally enabled by default. If you see the error:
- Update macOS to the latest version (System Settings → Software Update)
- Temporarily disable third-party extensions (especially aggressive ad blockers or privacy tools) via Safari → Settings → Extensions
After applying these changes, refresh the assessment page and run the system check again.
4. Access to the camera and microphone
Page for checking webcam in browser: https://webcammictest.com
Page for checking microphone in browser: https://webcammictest.com/mic/
4.1. In Chrome Browser
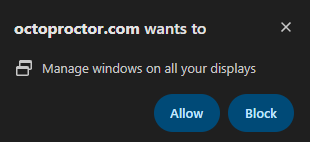
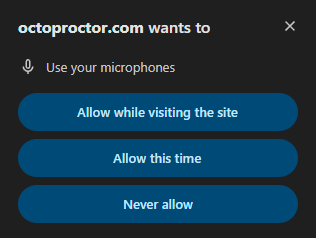
The first time you request permission to place windows on your screens, access the camera and microphone, you must answer "Allow":
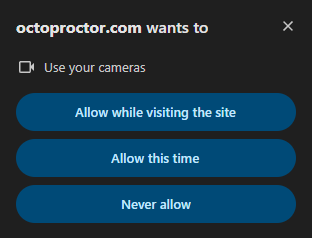
If several cameras are connected to the computer:
-
Click on the camera icon on the left side of the address bar and go to the settings by the "More options arrow" (Windows and Linux) or the "Manage multimedia device settings" button (MacOS)
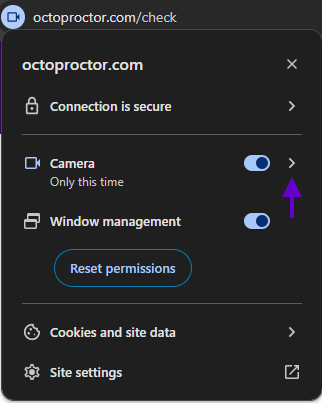
-
Select "Manage"
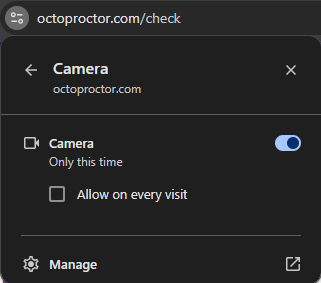
-
In the pop-up list, select another camera
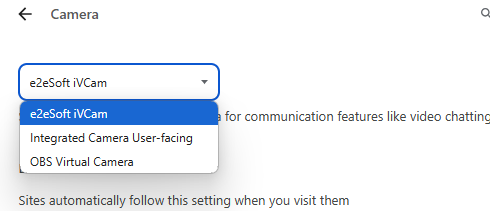
After changing the settings, you need to refresh the test page. If several microphones are connected, you should follow the same steps for the "Microphone" item.
If access was blocked:
-
Click on the camera icon on the left side of the address bar and go to the settings by the "More options arrow" (Windows and Linux) or the "Manage multimedia device settings" button (MacOS)
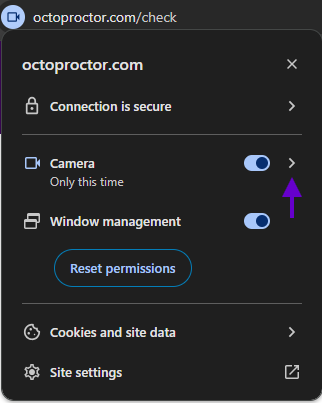
-
Remove from the list of blocked sites
https://*.proctoring.app:443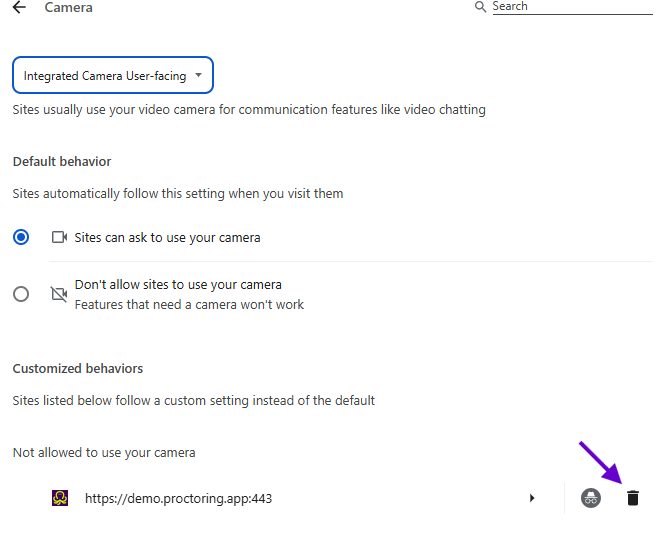
-
Reload the page and reply to the request for access "Allow"
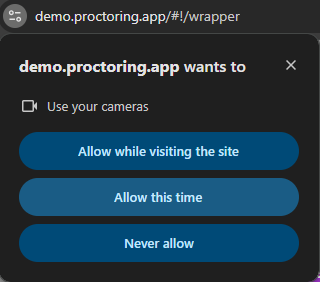
Another way to allow access to the camera and microphone is to click on the settings icon in the left part of the address bar and click toggle switches of the "Camera" and "Microphone" items.
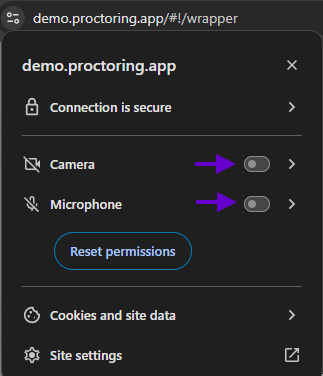
4.2. In Firefox Browser
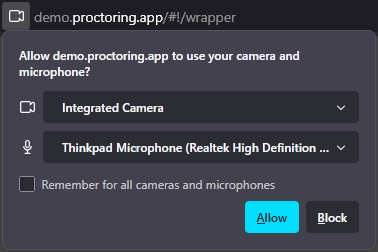
The first time you request permission to access the camera and microphone, you should answer "Allow". To avoid repeated requests, you can check the box "Remember for all cameras and microphones". If access was denied, you should reload the page and give permission again.
5. Screen access
To provide screen access in any browser, you need the following: Go to your browser settings and make sure that the proctoring site has all the necessary permissions. To access the screen, the site must have "Window management" permission (the name may vary in different browsers)
5.1. In Chrome Browser
There are three ways to allow access to the screen on a computer in the Chrome browser:
- In the version of Chrome 92+, access to the screen is requested automatically, no additional actions are required
- In older versions of Chrome, you need to install the Supervisor browser extension
- Instead of the extension, you can allow access to the screen with a special flag, which must be specified as an argument when running the "chrome.exe" file:
--enable-usermedia-screen-capturing
You should provide access to the entire screen
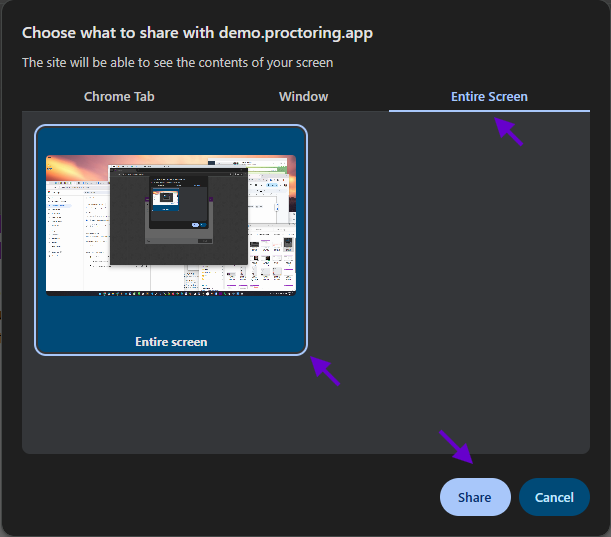
During the session the access should not be withdrawn, so you shouldn't click "Stop sharing", but you can click "Hide".

5.2. In Firefox Browser
There are two ways to allow access to the screen on a computer in the Firefox browser:
- In Firefox 66+, access to the screen is automatically requested; no additional actions are required;
- In older versions of Firefox, you must install the Supervisor browser extension.
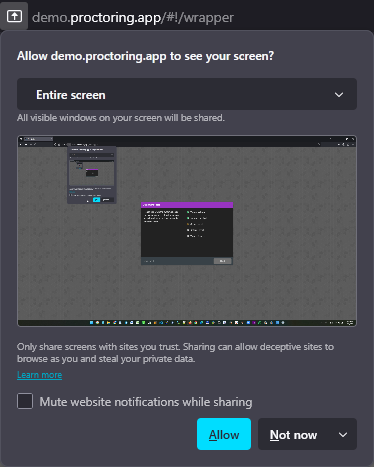
You should provide access to the entire screen. To do this, in the pop-up window in the window or screen selection field, select "Entire screen", and then click "Allow":
5.3. "Full-screen mode is disabled" message on MacOS
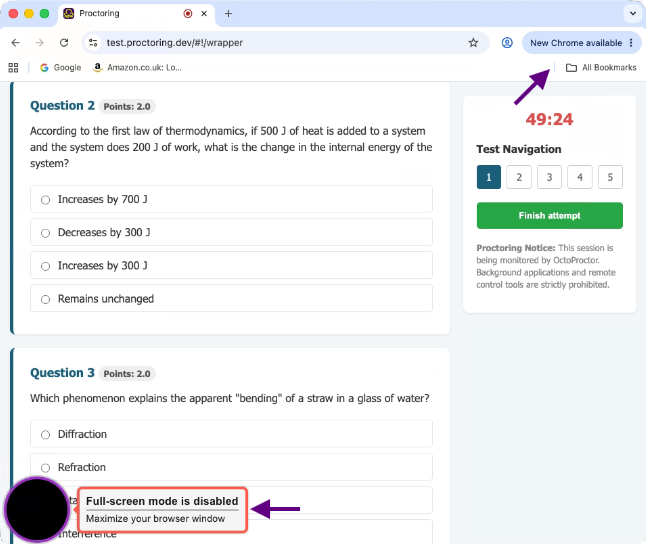
If your browser window is maximized, but the "Full-screen mode is disabled" warning still appears in the bottom-left corner, please hide your bookmarks bar:
- Google Chrome: Cmd + Shift + B
- Safari: Cmd + Shift + B as well as similar panels and sidebars.
6. Check for compatibility with WebRTC technology
In order for online video surveillance to work properly, outgoing connections to ports on the users' network must be allowed:
3478/tcp3478/udp49152-65535/udp
WebRTC verification can be done at WebRTC Test. To start the test, click on the "Start Test" button. If no problems are found, then all items should be green.
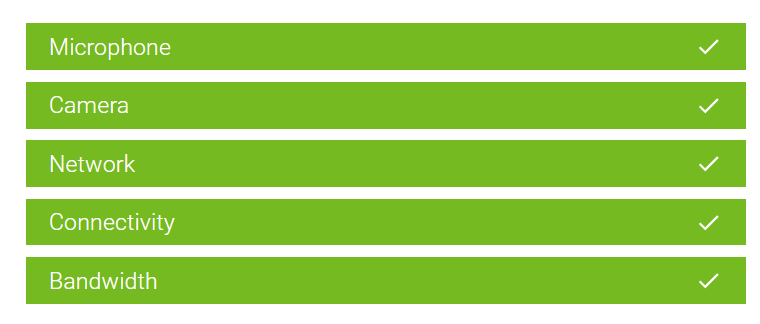
If the check fails, carry out the following steps:
While using PC:
- Step 1 - Disable VPN, if in use.
- Step 2 - Disable the firewall, if using Windows OS. If not, go to step 3. Instructions to disable the firewall.
- Step 3 - Try connecting to a different internet service provider or sharing the internet from your phone. Also, if you are using a router, you should try connecting the cable directly to your computer/laptop.
- Step 4 - Check the speed of your internet connection. Link to check. The minimum incoming and outgoing internet connection speed to pass the test must be 256 kbps.
While using smartphone or tablet:
- Step 1 - Connect to the internet connection that you are using on your computer/laptop.
- Step 2 - Disable any extraneous software, including antivirus. You should only have your browser running.
- Step 3 - If none of the above helps, please contact your university/organization's technical support team, specifying your phone/tablet model and name and version of your phone's operating system.
7. No access to webcam or black square instead of video
If a picture with a crossed out camera, a black rectangle, or a loading indicator is displayed, it means that the browser cannot access the camera or the camera does not work correctly. The reason may be problems with the webcam, the camera driver or access to the camera from a web browser, if the camera is in use by another application in the operating system (such as Skype or another browser), or access the camera is blocked Antivirus (ESET — static picture icon crossed out camera, Kaspersky — black screen). You should close all applications that can work with the camera, disable the antivirus (or camera protection in it) and update the current tab in the browser. You can try restarting the computer.

If everything else fails, you can try resetting Chrome by opening the "chrome://settings/resetProfileSettings" page and confirming the action.
For Windows 10:
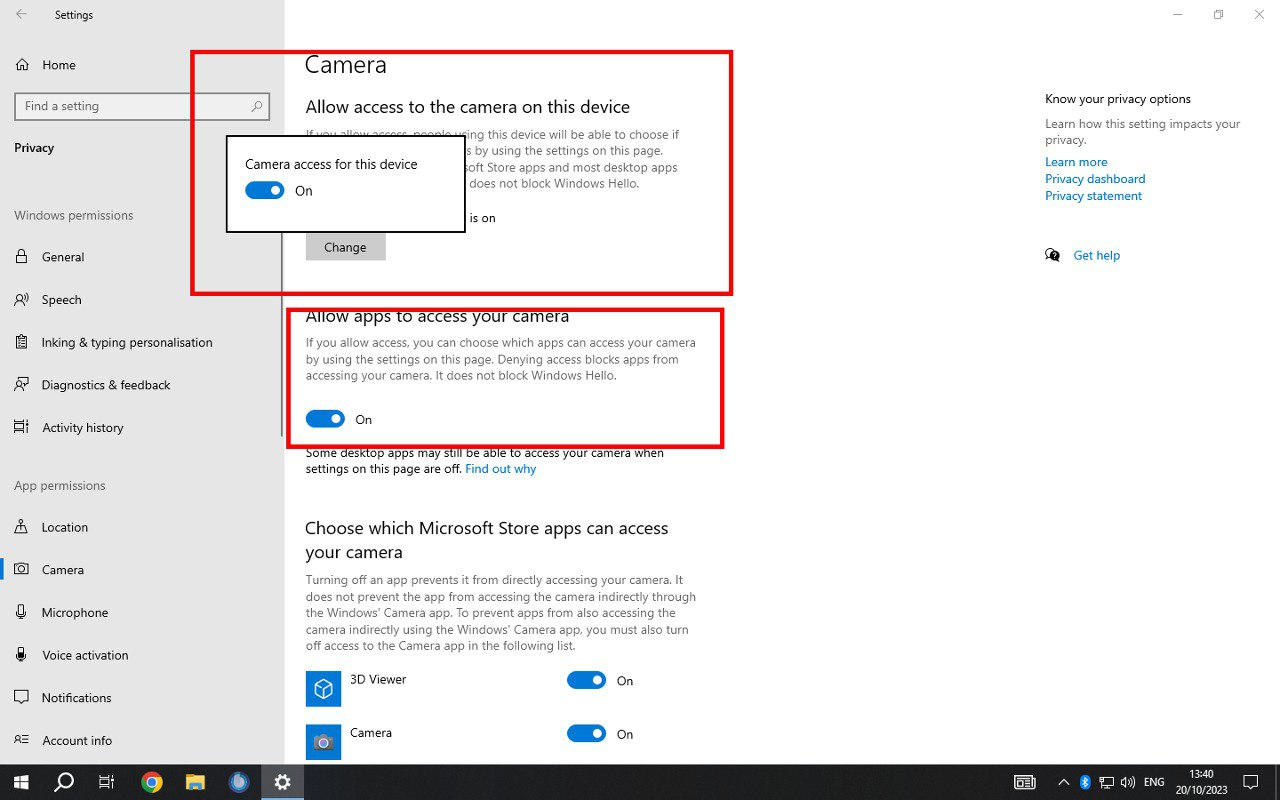
- Select "Start" → "Settings" → "Privacy & security" → "Camera", then make sure your camera access is turned on. This setting lets any user on the device choose if they want apps to be able to access the camera.
-
Find Allow apps to access your camera and make sure it's turned on. This setting allows you to choose if any of your apps can access the camera. It doesn't set which specific apps can access the camera.
-
Once you've allowed your apps to access the camera, you can change the setting for each app. Find the app you want, then turn on camera access for that app.
-
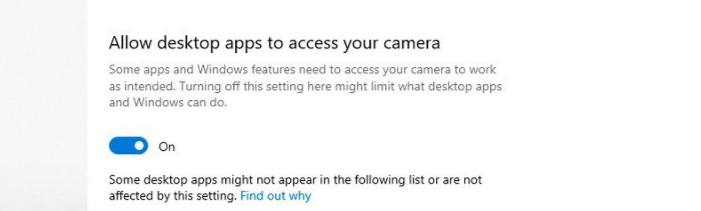
If you don't see an app in the list, it might be a desktop app. Find Let desktop apps access your camera and make sure it's turned on. You can't change camera access settings for individual desktop apps.
8. The assessment page does not open in IFRAME
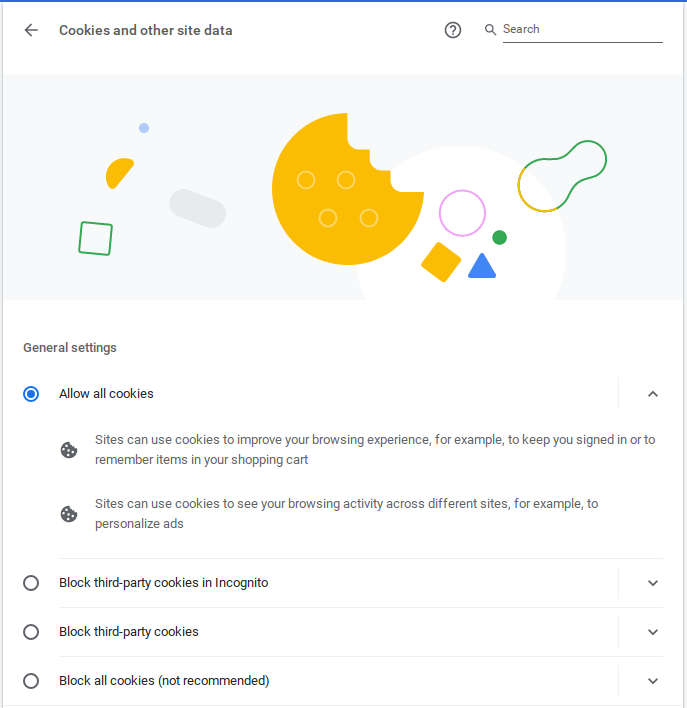
Cookies of third-party sites should not be blocked in the browser, in Chrome this is done in the settings "Settings" → "Privacy and security" → "Cookies and other site data" or you can simply enter "chrome://settings/cookies" into the address bar. "Allow all cookies" should be enabled there.
Page loading can also be blocked by some browser extensions, such as VPN Proxy or AdBlocker. You should try disabling all third-party extensions. In the Chrome browser, this can be done on the "chrome://extensions/" page, which can be opened through "Menu" → "Advanced Tools" → "Extensions".
9. No access to the screen
Access must be granted to the entire screen and no additional monitors must be connected to the computer and no multiple virtual desktops must be set up. Otherwise there will be an error when checking screen access.
9.1. macOS
Starting with macOS "Catalina" 10.15, you need to grant additional permission in the system settings to access the browser screen. To do this, go to system settings in the System Preferences menu.
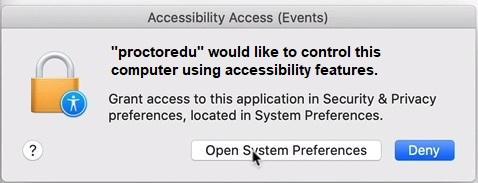
Then select "Security" → "Privacy".
On the left, scroll down and click "Screen Recording".
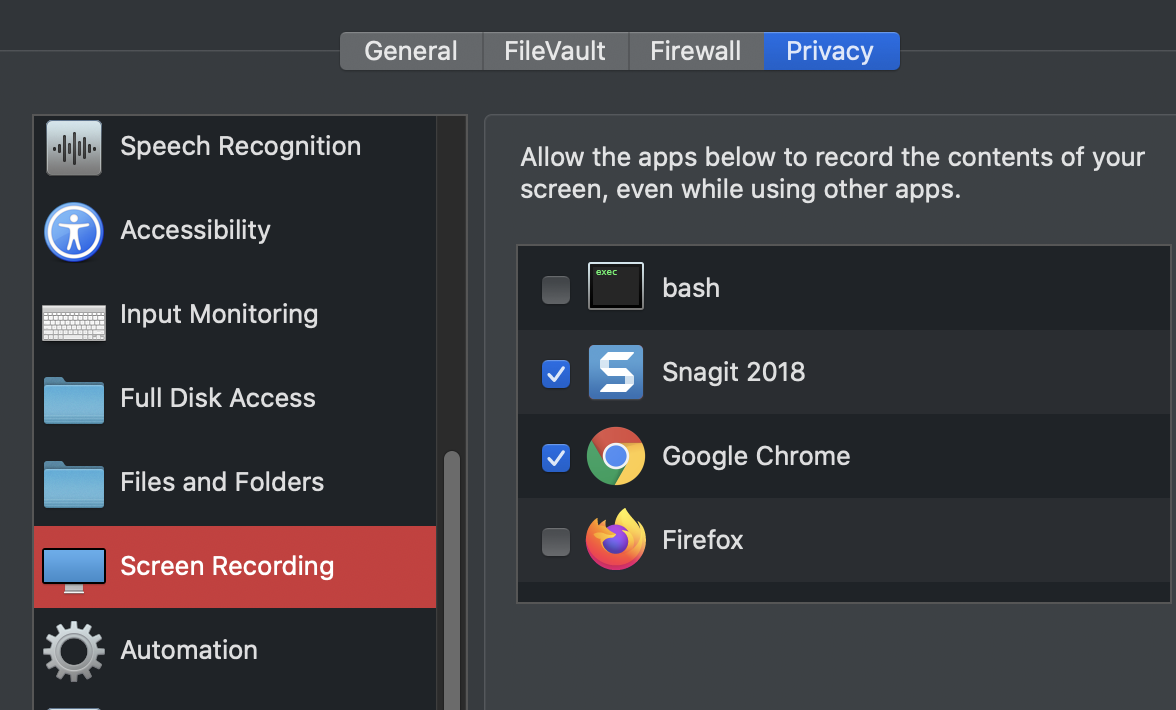
In the suggested list, select the browser that you want to allow access to the screen recording.

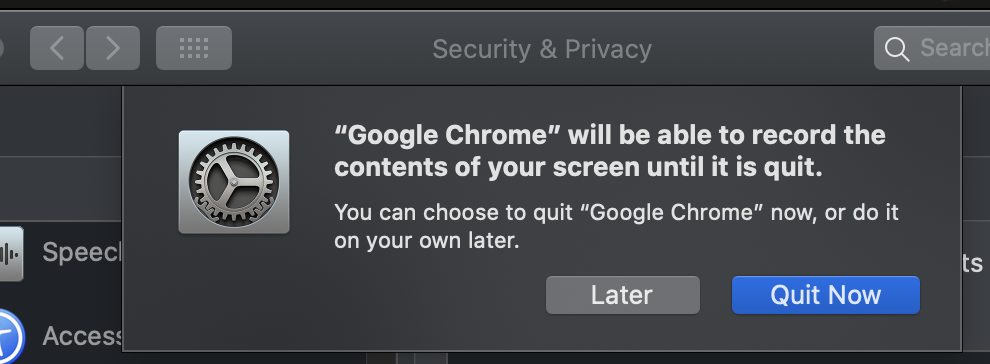
After that, you will need to restart the browser.
9.2. Linux
Sometimes in Linux there is a problem when only the mouse cursor is displayed instead of a picture from the screen.
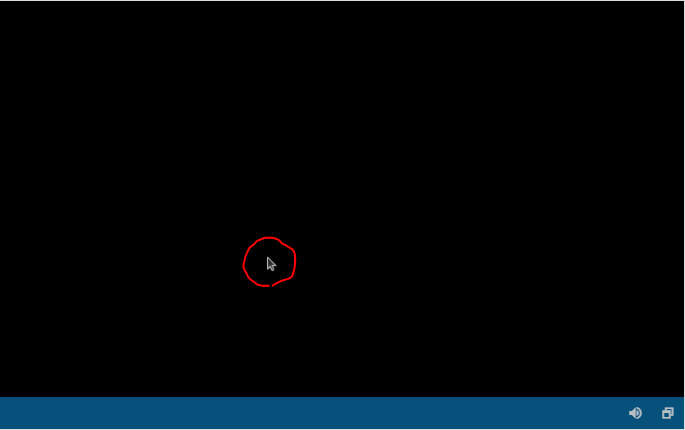
This problem occurs if the original (proprietary) video driver is not installed on the computer. You need to install the driver, restart the computer, after which the screen should be shared correctly.
10. The MediaRecorder error on Safari
10.1. macOS
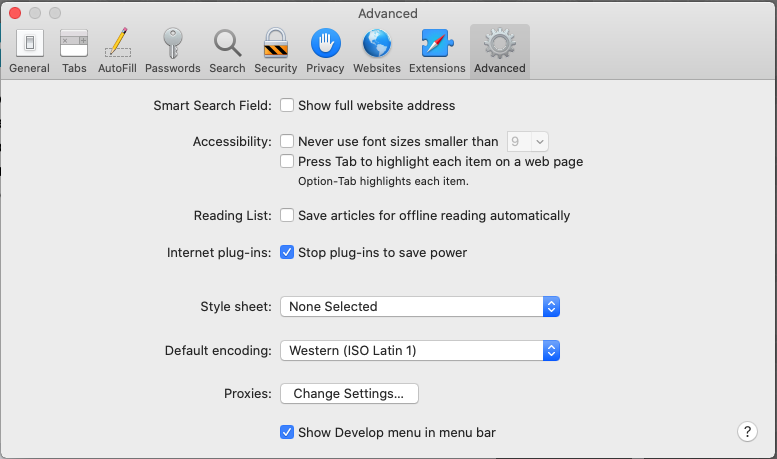
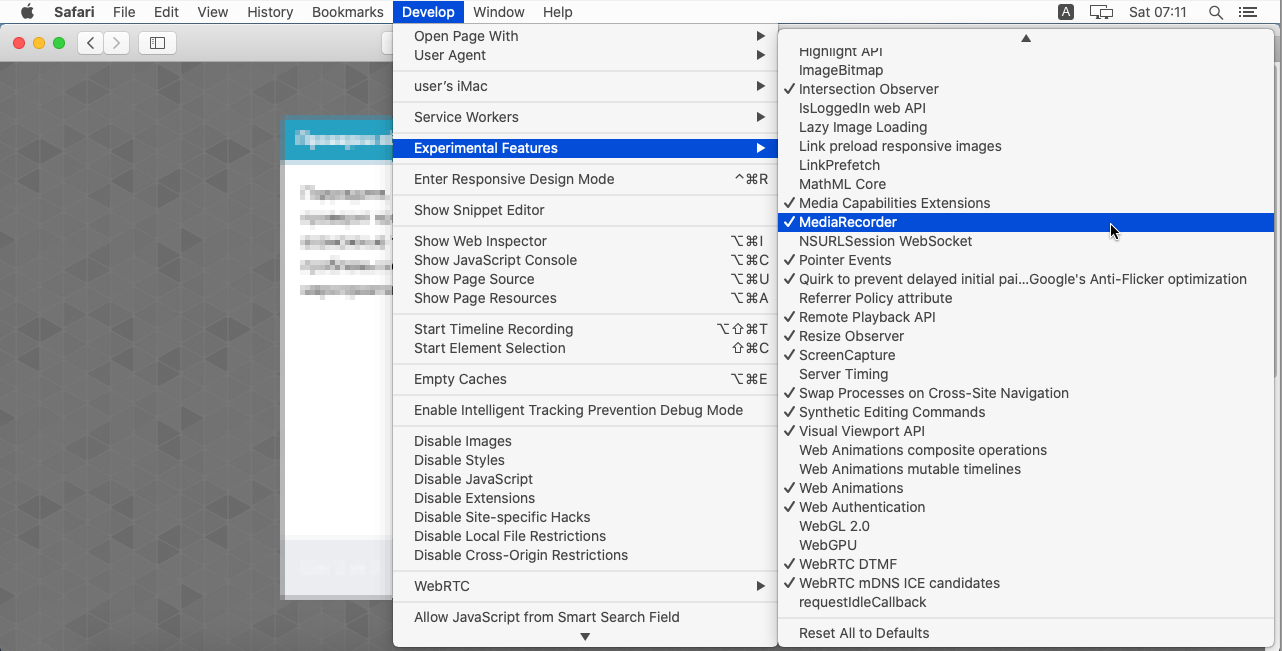
The MediaRecorder option must be enabled in Safari on macOS for the system to work correctly. This is done by enabling the developer menu under "Safari" → "Properties" → "Show Develop menu in menu bar":
Then activate the "Develop" → "Experimental Features" → "MediaRecorder" option:
10.2. iOS
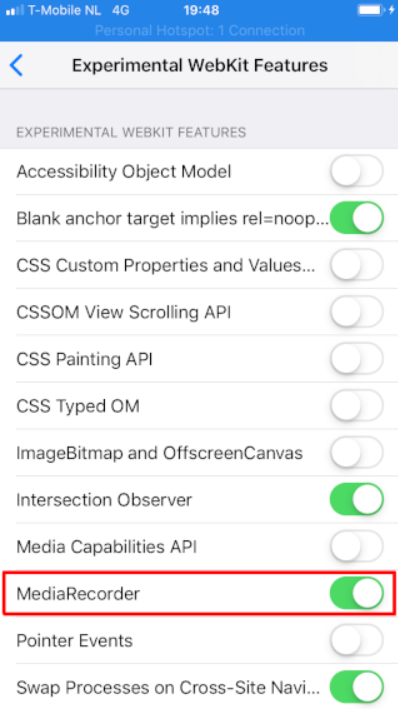
For the system to work correctly in iOS Safari, the MediaRecorder option must be enabled in the "Settings" → "Safari" → "Advanced" → "Experimental Features" → "MediaRecorder".
11. Scrolling does not work on Safari
11.1. iOS
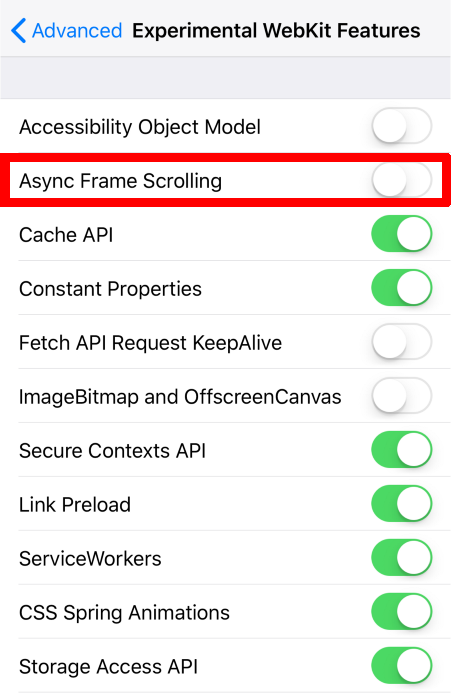
In iOS Safari, scrolling inside IFRAME elements may not work when "Async Frame Scrolling" is enabled in Safari. You should disable this option "Settings" → "Safari" → "Advanced" → "Experimental Features" → "Async Frame Scrolling".
12. Turn off notifications and calls
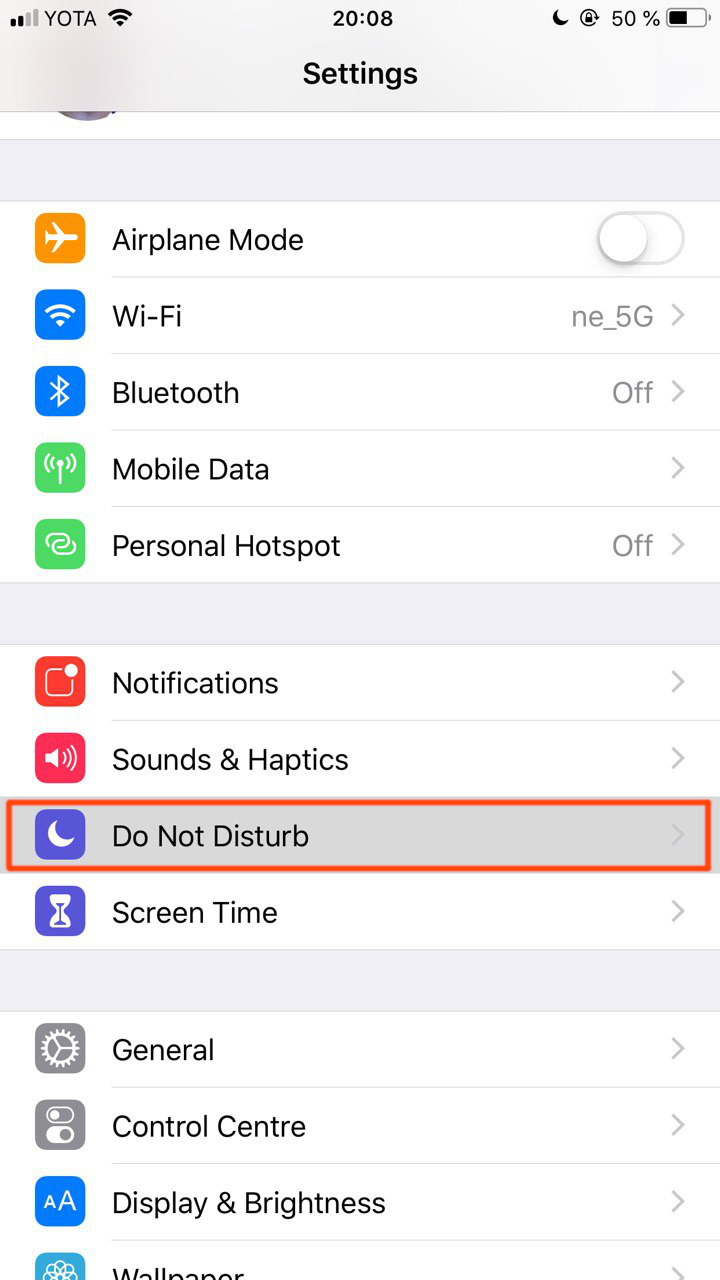
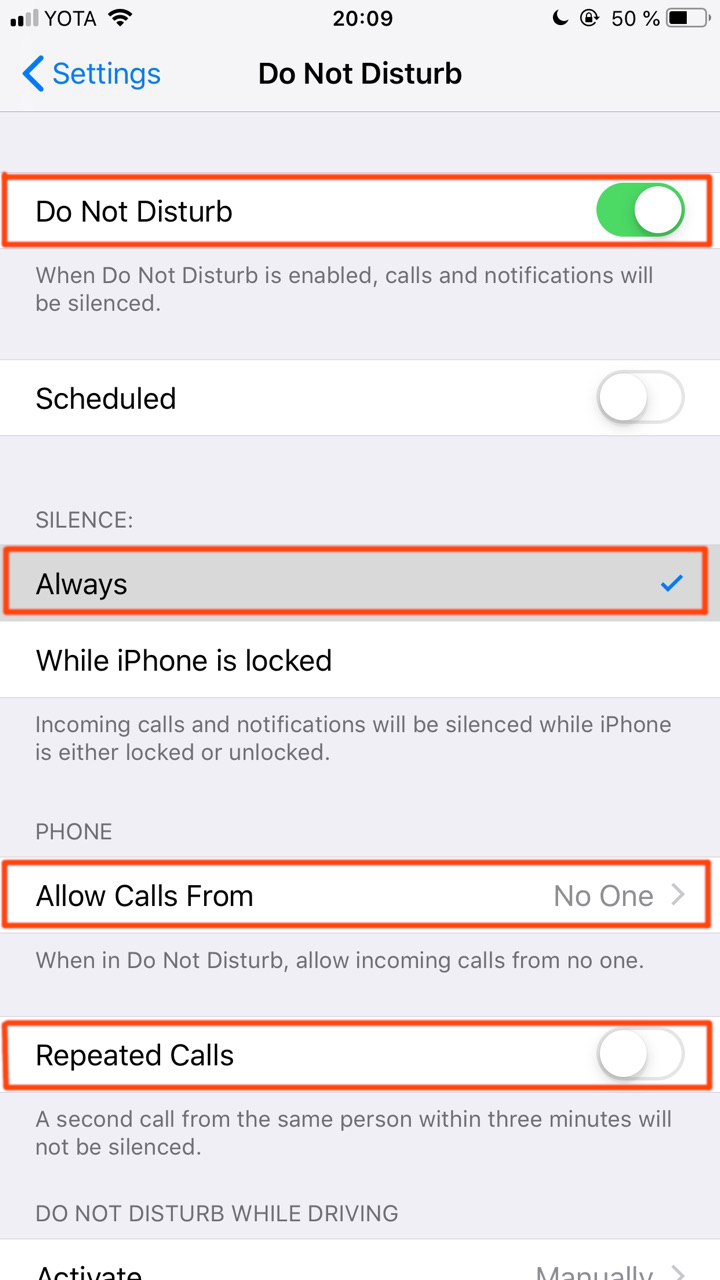
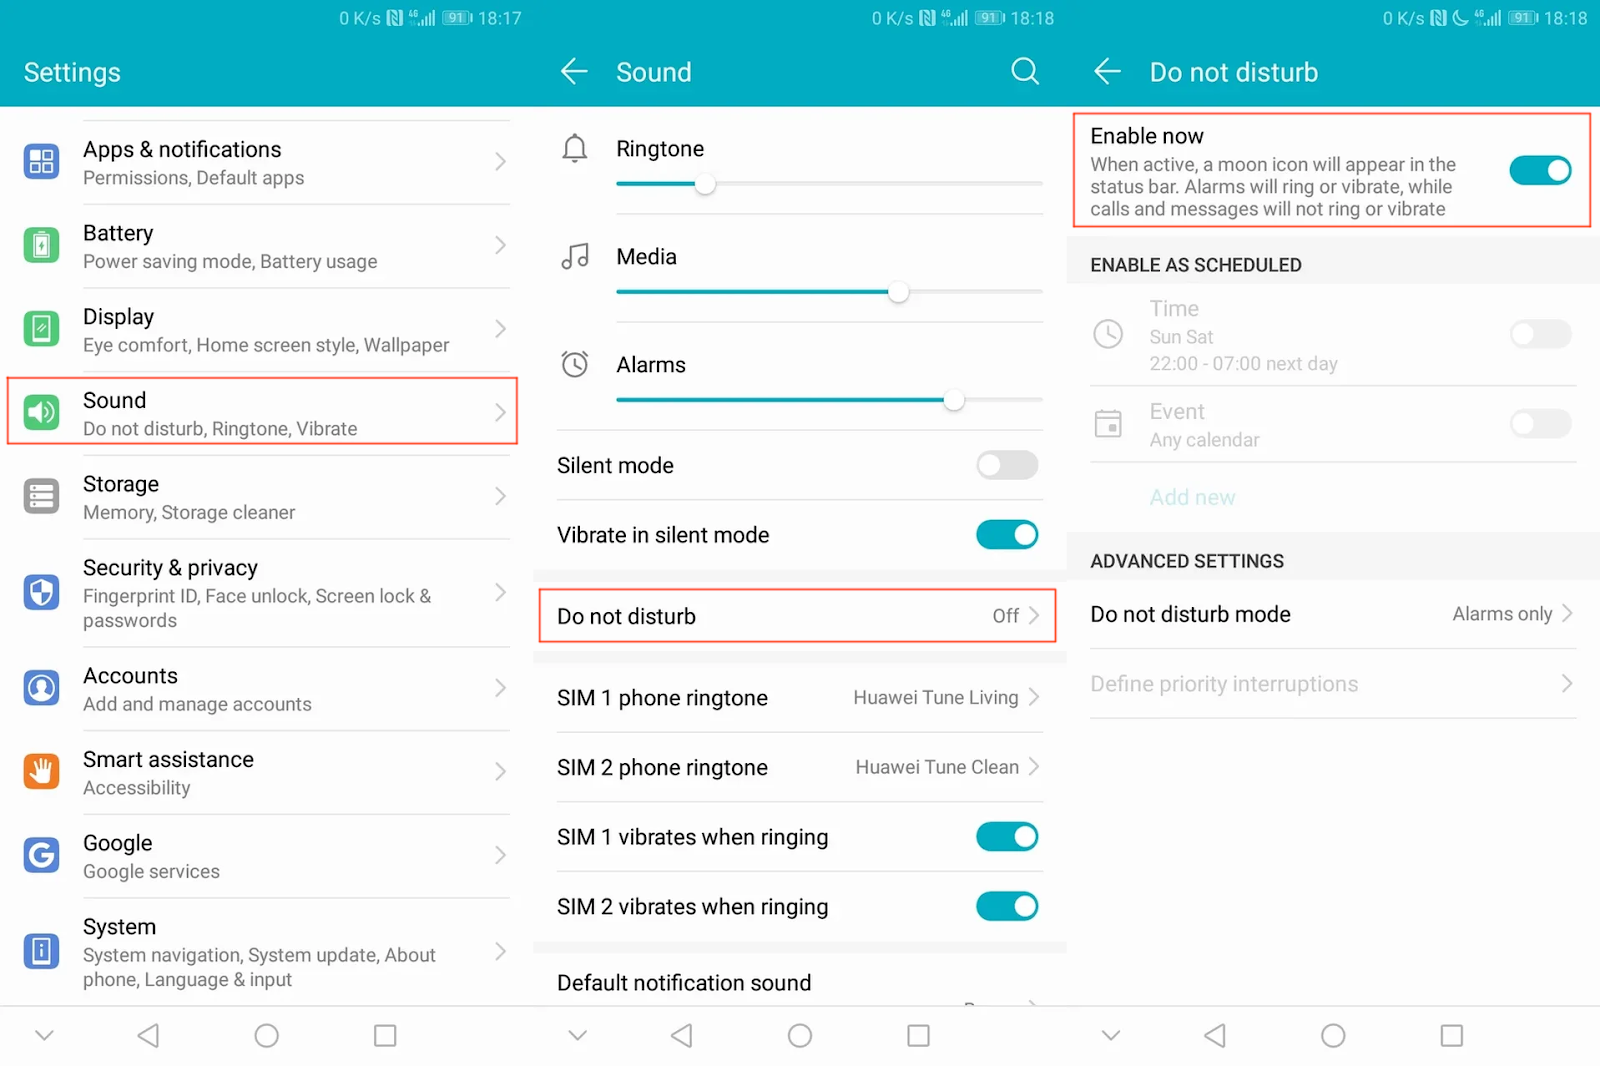
It is recommended to turn off notifications and incoming calls when passing proctoring on mobile devices or when connecting a mobile camera. To do this, follow the steps below.
12.1. iOS Safari
Go to "Settings" → "Do not disturb" → enable "do not disturb" at the top, "Silence" → always, "Phone" → allow calls from → no one, Remove flag in "repeated calls".
12.2. Android Chrome
Go to "Settings" → "Sound" → "Do not disturb" → "Switch off now".
13. Error "Session blocked"
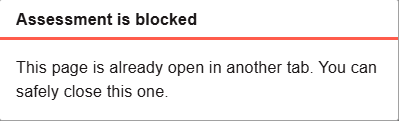
The error "Session blocked: This page was opened elsewhere, close this tab" means that the proctoring is opened in a separate page, browser, PC, mobile. You may pass the assessment only in one browser tab with the proctoring. In such cases, close all additional tabs and pass the assessment within your first window.