Sakai LMS Integration Guide
1. How it works
The integration of the proctoring system with the Sakai LMS is done using the Learning Tools Interoperability (LTI) and the Supervisor SDK (JavaScript proctoring library). First, you need to place the custom SDK code on one of the HTML pages in the LMS, and then configure the LTI in the course module to access proctoring through the LMS.
2. Setting up a quiz element
In the course module, you must have created a Quiz element to which you want to connect proctoring.
-
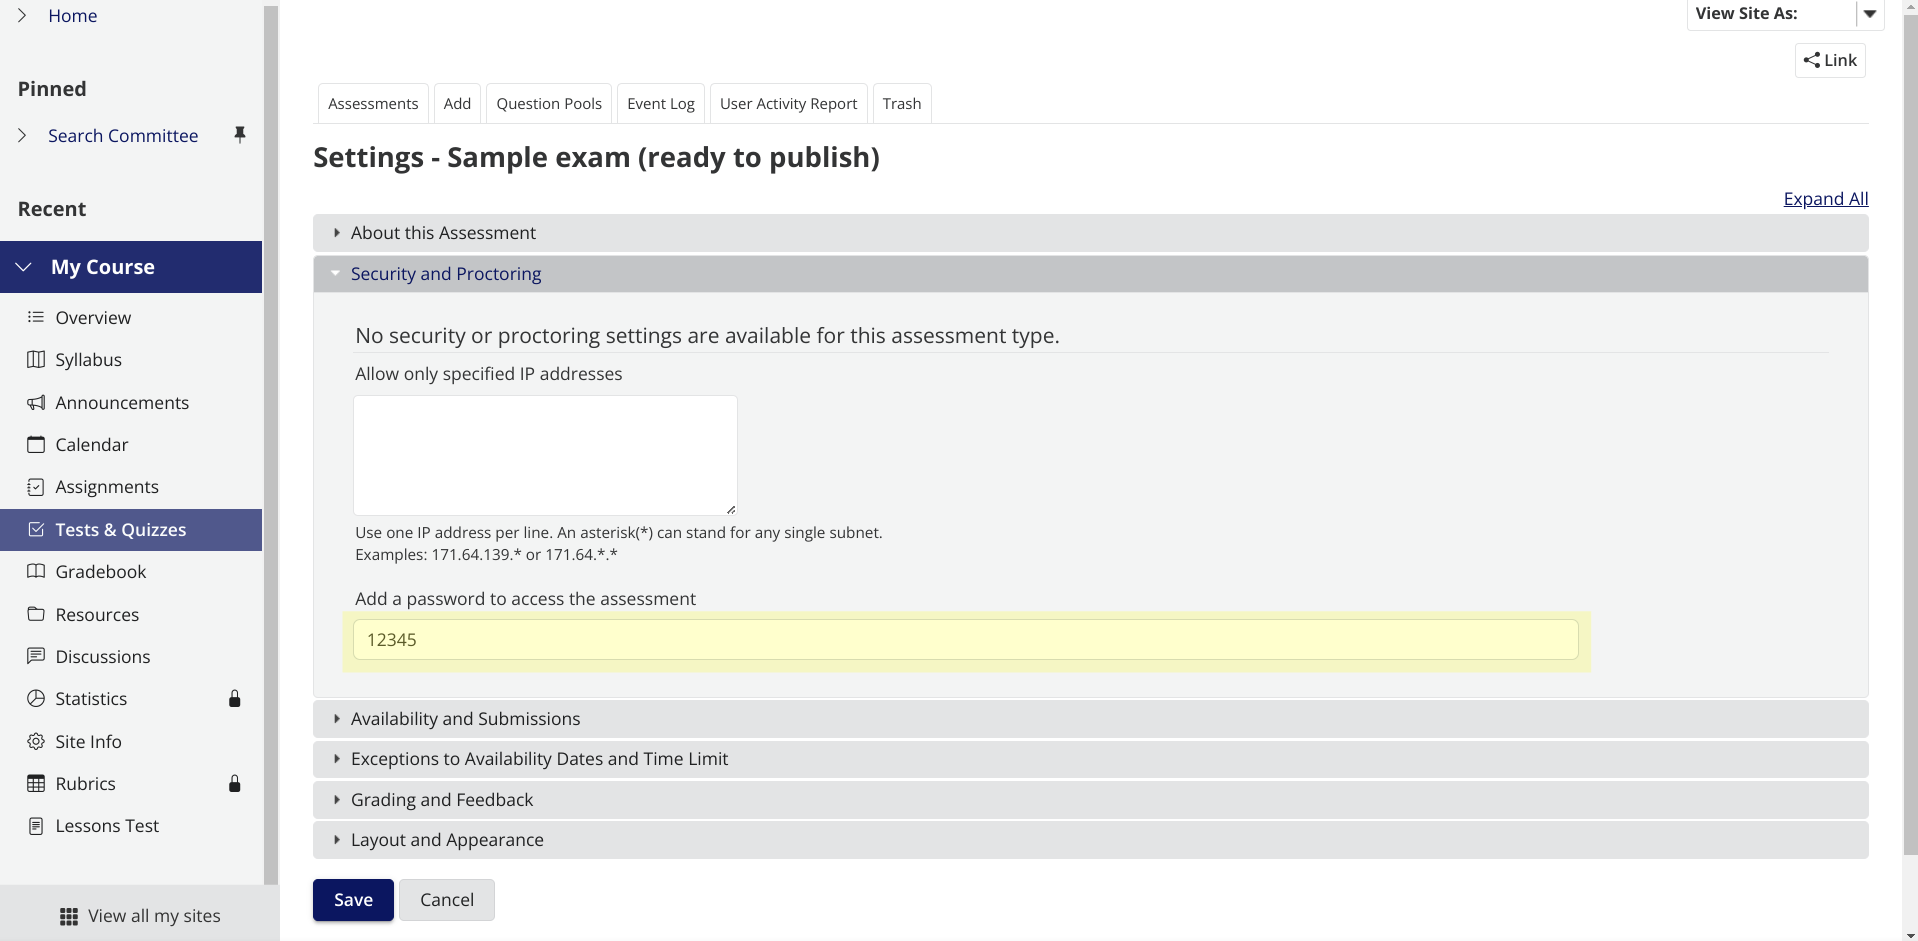
Open the "Tests and Quizzes" page and the "Assessment List" tab. Go to the settings of your quiz and open the "Security and Proctoring" section:
-
Enter a quiz password in the "Add a password to access the assessment" field and click the "Save" button.
-
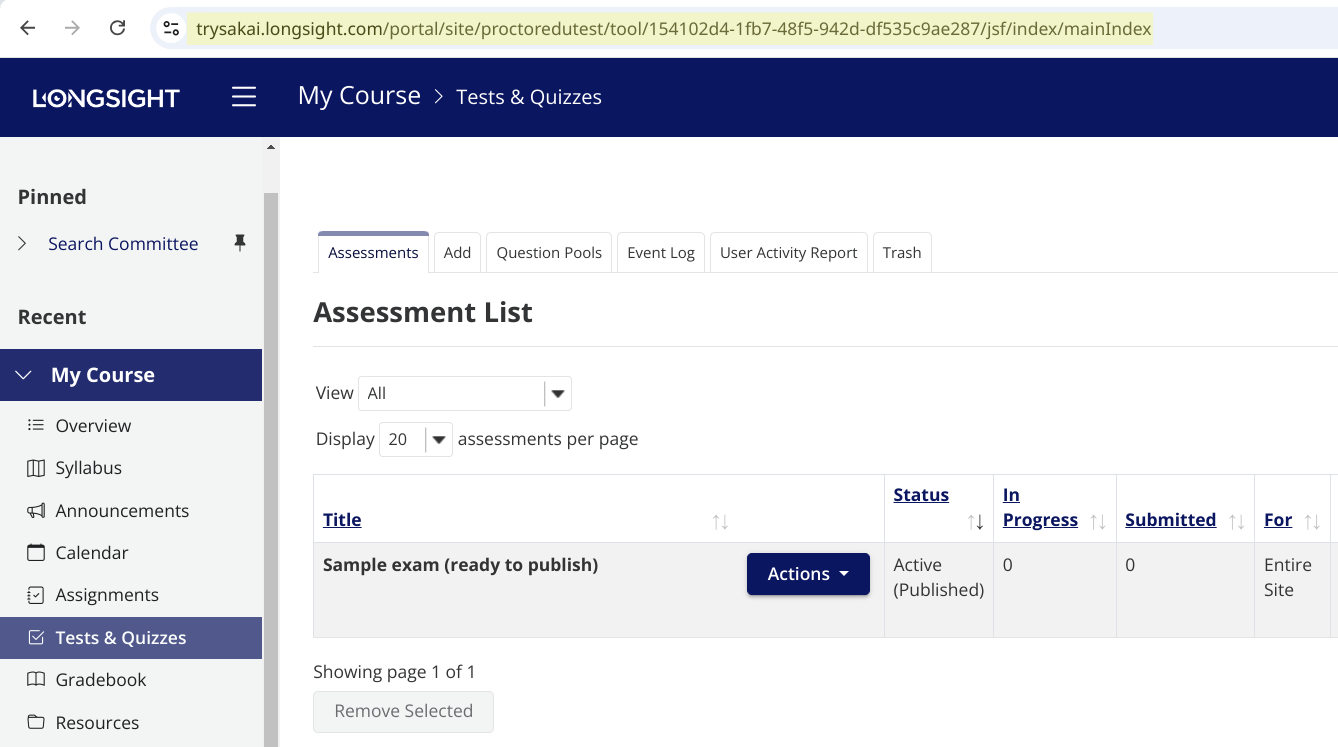
Then return to the "Assessment List" tab and copy the URL from your browser's address bar:
-
Save the URL for future reference.
3. Upload the proctoring script
Next step is to place the proctoring launch script on the course page. A test-taker is going to be redirected to this page after successful user authorization via LTI and may see a service message "There is nothing here. This is a service page for proctoring". The displayed message can be changed if necessary, by editing it in the code below.
-
Save the code below in the "proctoring.html" file on your computer:
<!DOCTYPE html>
<html lang="en">
<head>
  <meta charset="utf-8">
  <meta name="viewport" content="width=device-width, initial-scale=1">
  <title>Proctoring</title>
</head>
<body>
  <p>There is nothing here. This is a service page for proctoring.</p>
  <script>
    (function (host) {
      const script = document.createElement('script');
      script.setAttribute('src', `https://${host}/sdk/supervisor.js`);
      script.dataset.supervisor = 'sync';
      script.onload = function () {
        parent.supervisor.on('load', function (iframe) {
          const { pathname } = iframe.contentWindow.location;
          if (pathname.endsWith('/jsf/delivery/confirmSubmit')) {
            parent.supervisor.stop();
          }
        });
      };
      parent.document.body.style.overflow = 'hidden';
      parent.document.body.appendChild(script);
    })('demo.proctoring.app');
  </script>
</body>
</html>
NOTE: You need to replace "demo.proctoring.app" with the domain of your proctoring server in the script code.
-
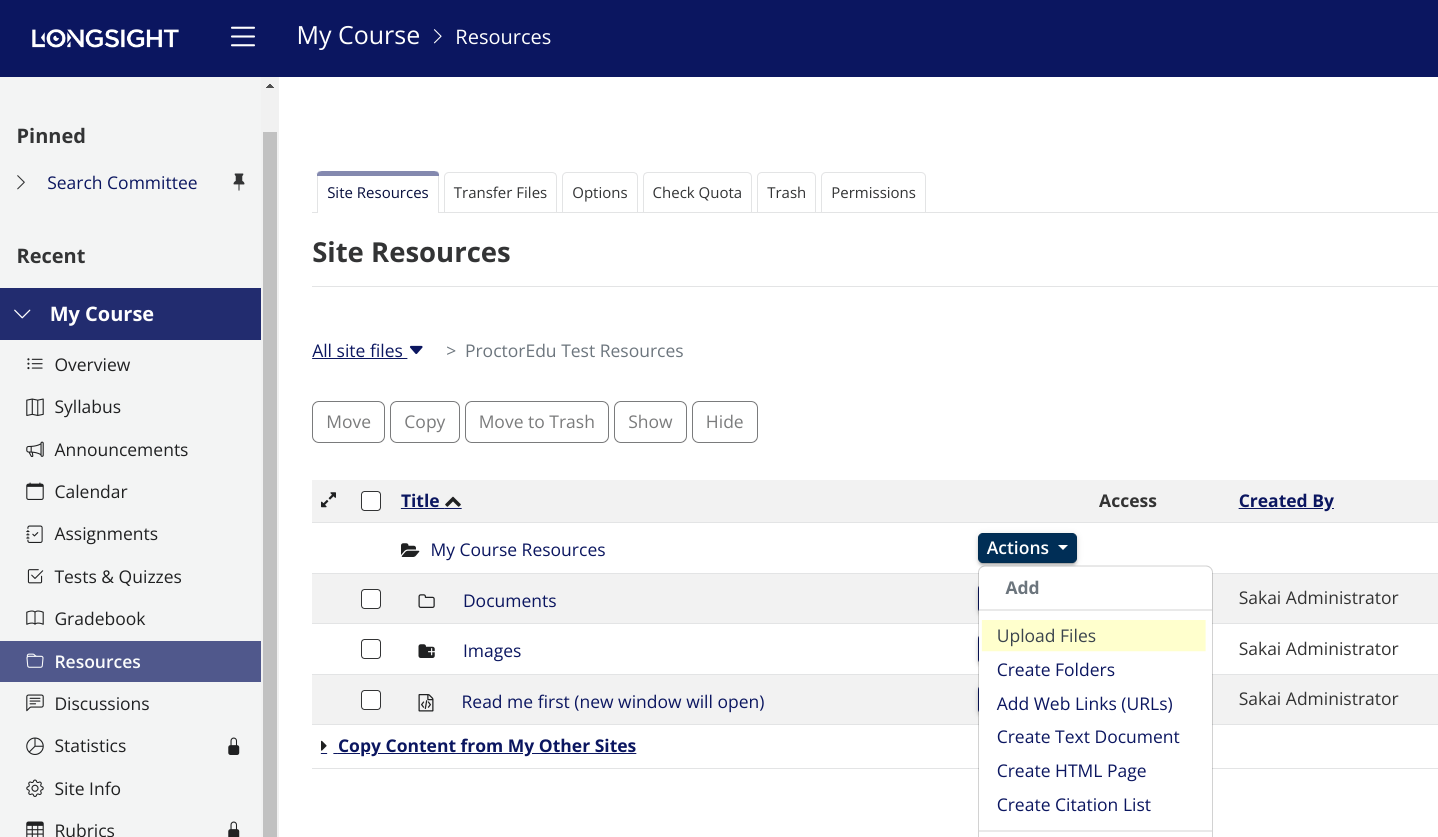
Go to the "Resources" section and click on the "Upload Files" item in the action menu:
-
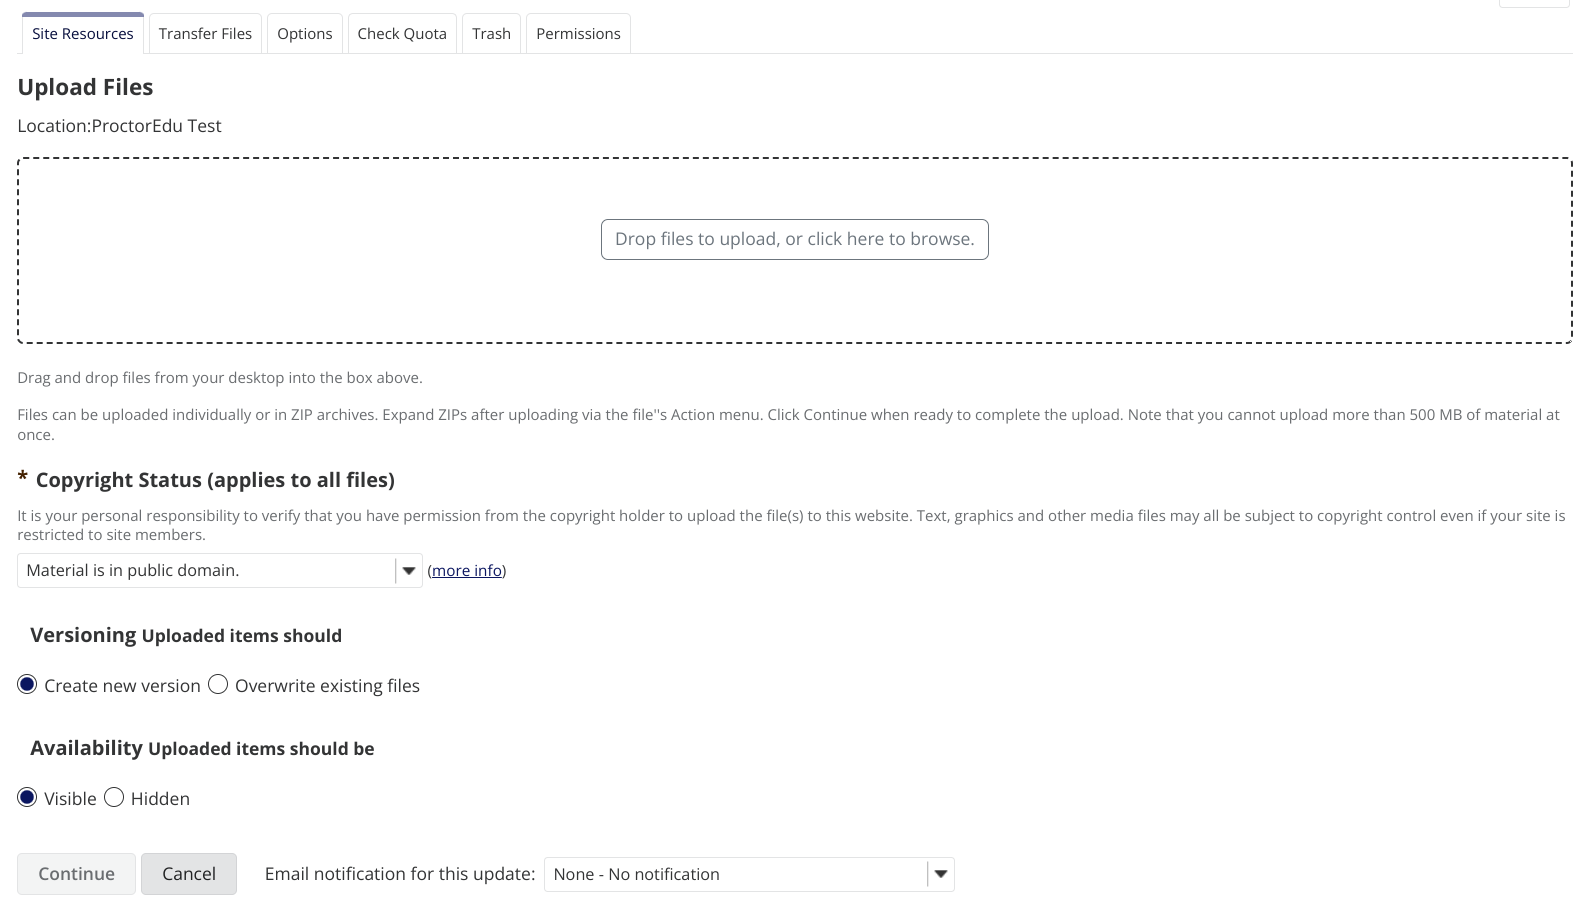
Select the "proctoring.html" file from your computer and click on the "Continue" button:
-
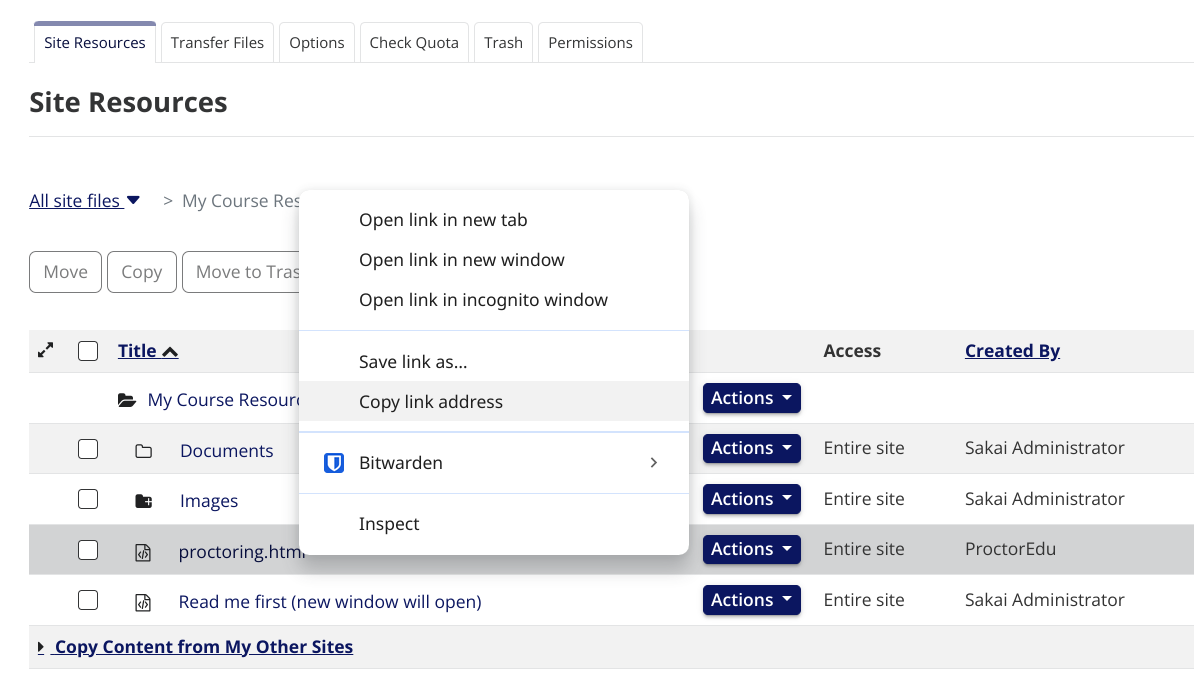
After returning to the previous page, right-click on the "proctoring.html" file name and select "Copy link address":
-
Save the URL for future reference.
4. Set up an external tool
Go to the "Site Info" → "External Tools" section and click on the "Install LTI 1.x Tool" link. Fill in the following fields:
- Tool Title: any name of the external tool;
- Button Text: any name of the external tool run button;
- Launch URL: a link to the proctoring tool, e.g.
https://demo.proctoring.app/api/auth/sakai?redirect=<proctoring.html>where<proctoring.html>should be changed to the full URL of the page from section 3, anddemo.proctoring.appwith the domain of your proctoring server. If the address contains?,&,#or+, URL-encode it before inserting it, otherwise the parameter is cut or changed; - Launch Key:
sakaiuse the consumer key for your proctoring server; - Launch Secret:
secretuse the secret key for your proctoring server; - Privacy Settings: check all items;
- Services: check all items;
- Indicate where in the Sakai User interface that these tools should appear: check all items;
- The launch URL for this tool must support at least one launch message type: "The tool URL supports a single LTI tool (Resource Link launch)";
- Launch in Popup: Always launch in Popup;
- Debug Launch: Never launch in debug mode;
- Custom Parameters (key=value on separate lines): leave blank.
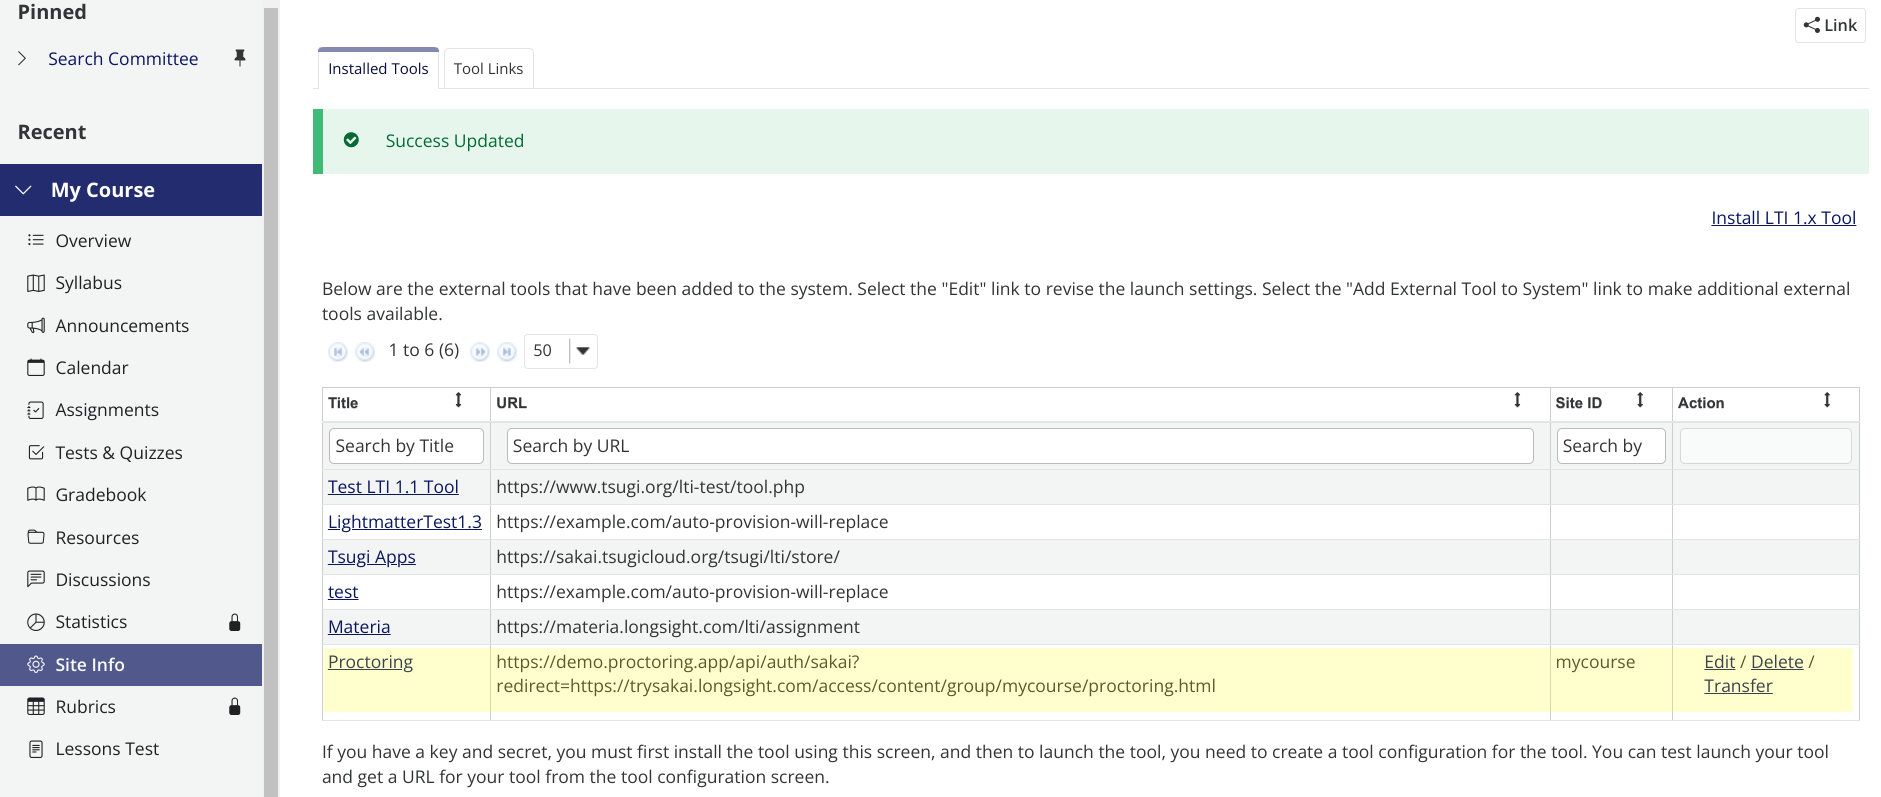
After you complete this step, you will see the tool as shown below:
5. Add a link to the external tool
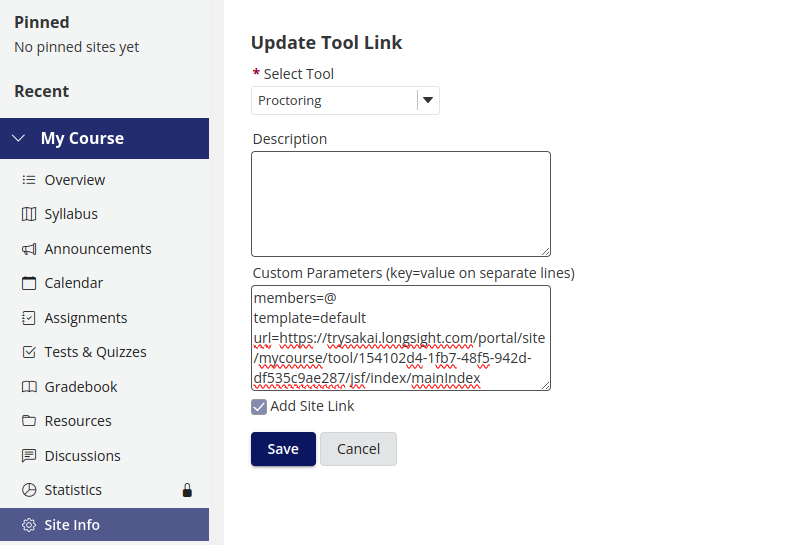
In order to create a link to the external tool in your course you need to go to the "Site Info" → "External Tools" section and the "Tool Links" tab. Click on the "Create Tool Link" button. In the new window fill in the following fields:
- Select Tool: your proctoring tool
-
Custom Parameters (key=value on separate lines):
Key Value templatedefaultmembers@url<quiz_url>code<quiz_password> -
Add Site Link: checked
NOTE:
<quiz_url>should be changed to the full URL of the quiz and<quiz_password>to the quiz password from section 2.
6. Use of proctoring
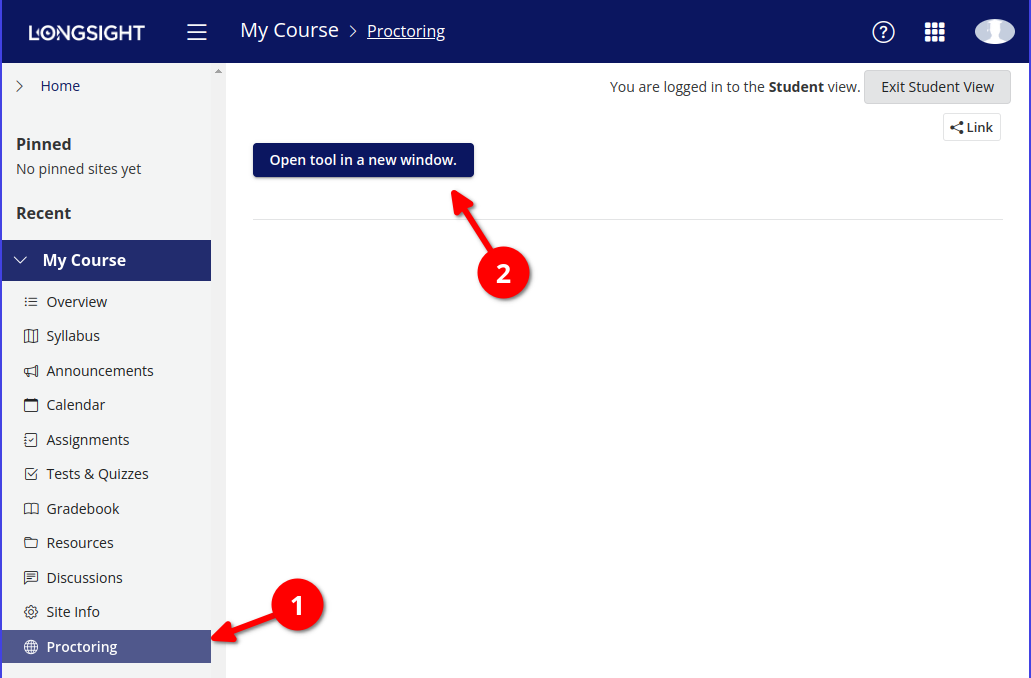
Now, when a test-taker navigates through the proctoring link, they will begin to take an associated quiz according to the proctoring workflow.
Clicking on the proctoring link takes an administrator or teacher to the proctoring interface, where they can access all sessions and their reports created by that link.
7. Setting up a self deployed proctoring host
To connect the integration API with Sakai, you need to load the following configuration with integration parameters under the proctoring system manager:
{
  "id": "<Host_ID>",
  "key": "<License_Key>",
  "params": {
    "webhooks": {
      "sakai": {
        "strategy": "lti",
        "consumerKey": "sakai",
        "consumerSecret": "secret",
        "callbackURL": "query.redirect",
        "profile": {
          "username": "payload.user_id",
          "role": "payload.roles.find(v => /Instructor/.test(v)) ? 'proctor' : 'student'",
          "nickname": "payload.lis_person_name_full",
          "lang": "(payload.launch_presentation_locale || '').slice(0, 2)",
          "group": "['G', payload.context_id, payload.resource_link_id].join('-')",
          "referrer": "payload.launch_presentation_return_url",
          "labels": "payload.lis_person_contact_email_primary"
        },
        "register": {
          "identifier": "[payload.user_id, payload.context_id, payload.resource_link_id].join('-').replace(/[^A-Za-z0-9_-]+/g, '_')",
          "template": "payload.custom_template || 'default'",
          "subject": "payload.resource_link_title",
          "members": "payload.custom_members === '@' ? user.group : payload.custom_members",
          "url": "payload.custom_url || payload.launch_presentation_return_url",
          "tags": "payload.lis_person_contact_email_primary",
          "code": "payload.custom_code"
        },
        "start": true,
        "stop": true,
        "pause": true,
        "submit": true
      }
    }
  }
}
NOTE: The fields
consumerKeyandconsumerSecretneed to be replaced with a randomly generated sequence of characters (Latin letters of different case and numbers, the recommended length is 24 characters);idis the ID of the host (if you do not specify it, a new host will be created);keyis the license key of this host.