Moodle LMS Integration Guide
1. Integration scenario
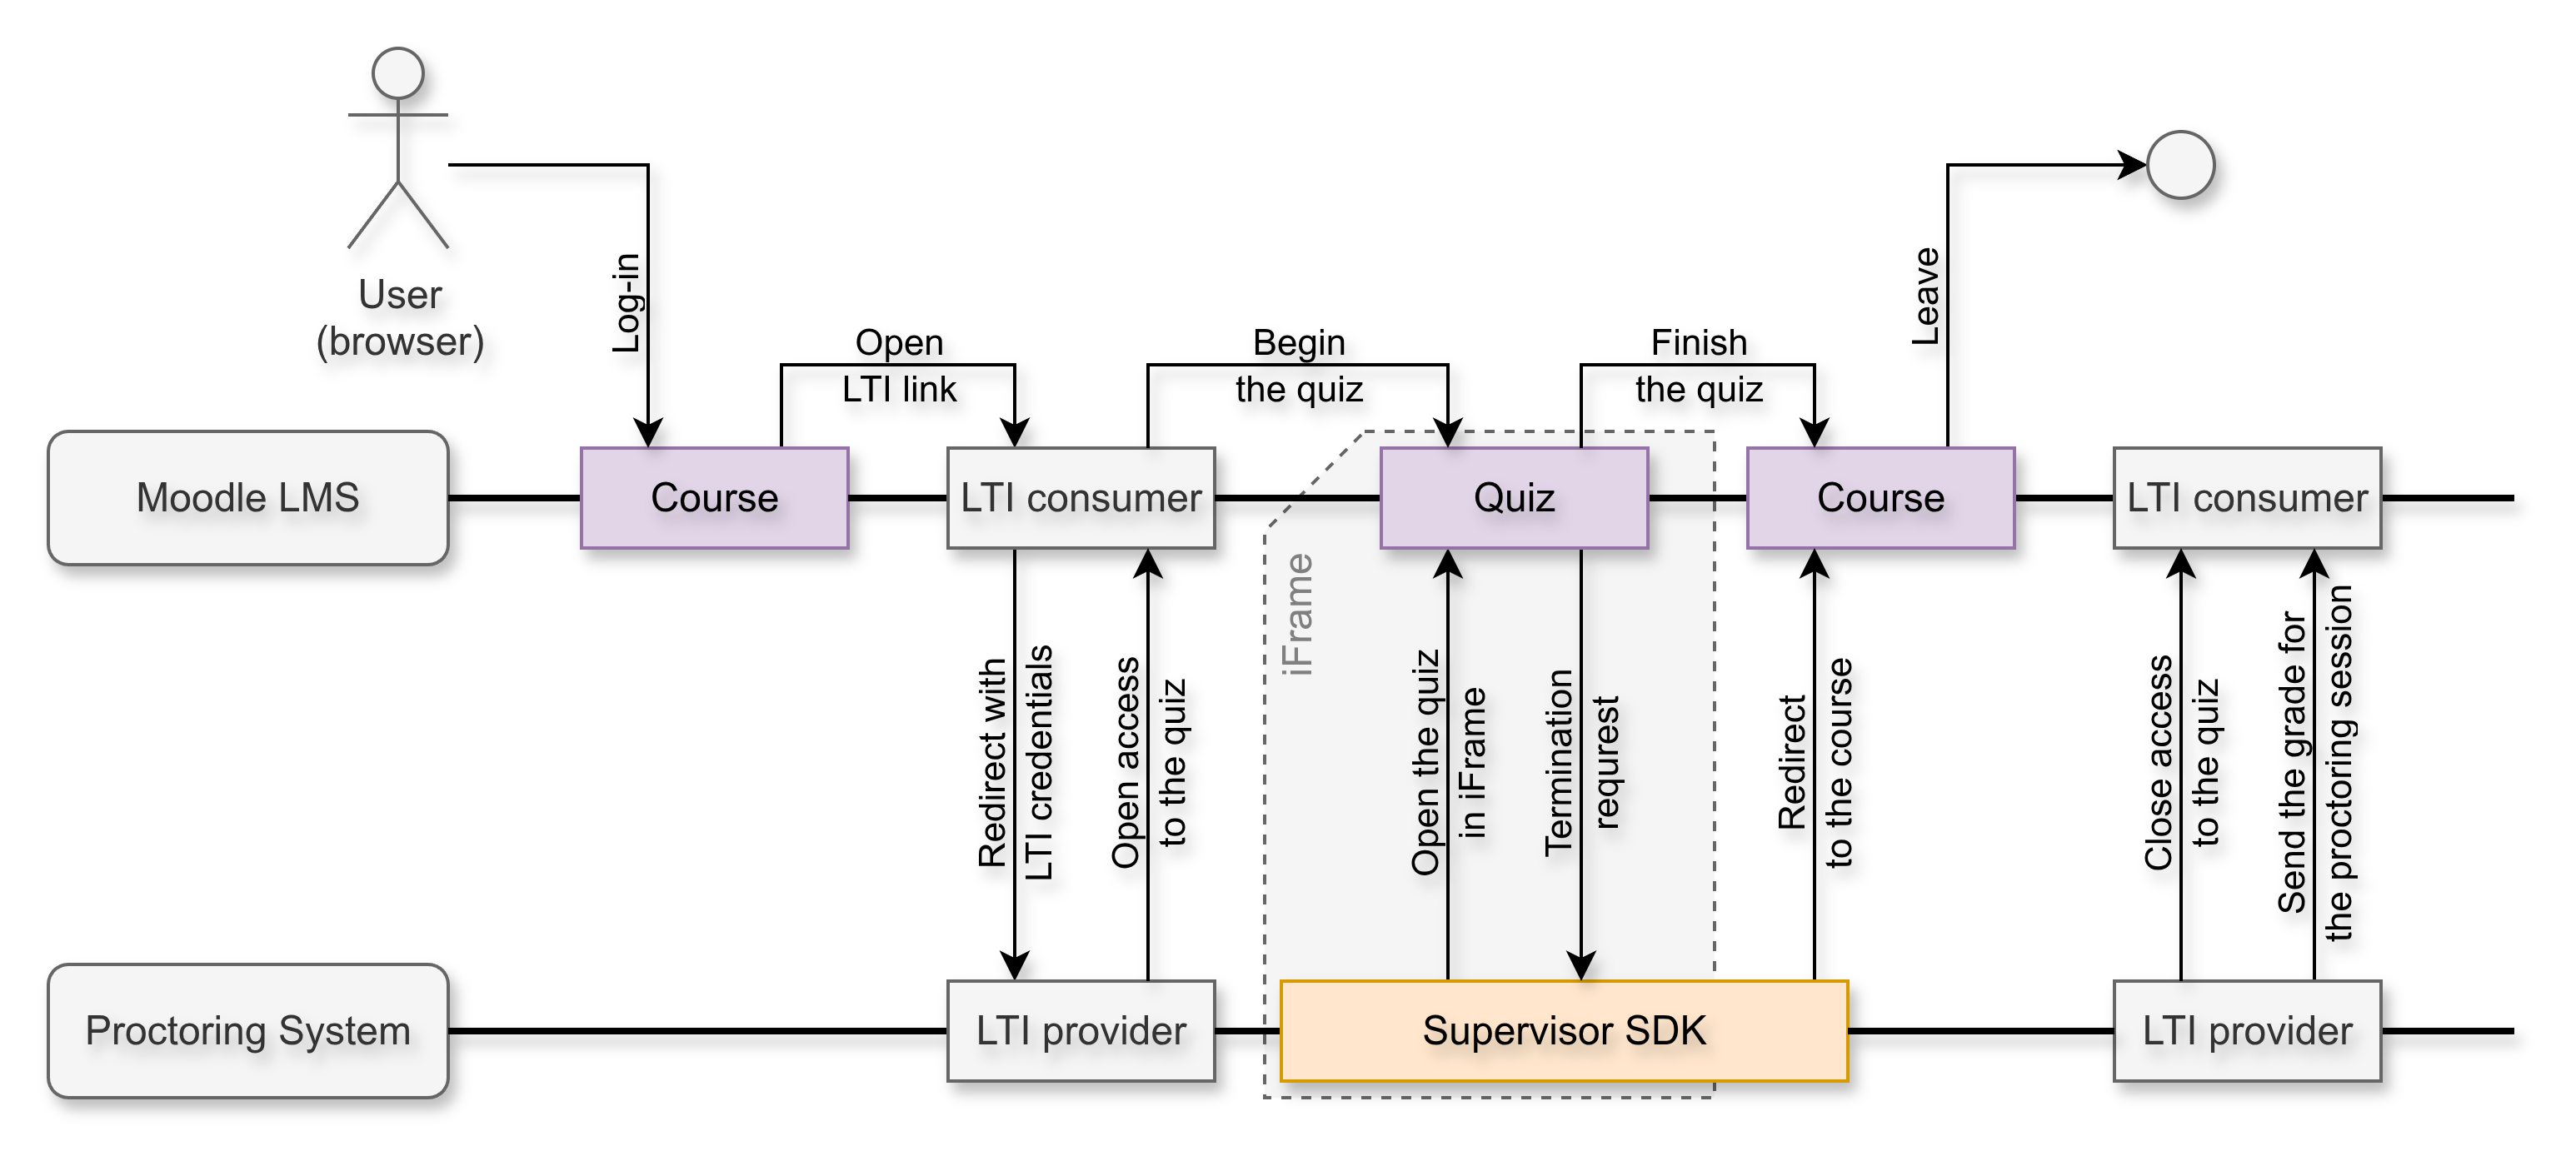
The OctoProctor system is integrated with Moodle LMS versions 3.8.2 and higher using IMS LTI standard. The integration requires setting up an external tool, adding the tool to a course, and setting up some custom parameters. Proctoring starts via the LTI link in the course, and a quiz loads in an iFrame during the session. Teachers and administrators can access proctoring online observation and reports via the LTI link as well. Each proctoring session returns results to Moodle via the LTI outcome service.
The scenario of a test-taker's interaction with the proctoring system and Moodle in the common case is as follows:
- A test-taker logs in to Moodle and opens their course;
- Goes to the LTI element configured with the proctoring system;
- Redirects to the proctoring system, where the proctoring session starts;
- The test-taker passes the quiz that opens in iFrame (the proctoring grade manages access);
- After the quiz ends, the test-taker is redirected back to the course page;
- After a while, the proctoring system sends the outcomes to Moodle.
2. Setting up Moodle
2.1. Allow frame embedding
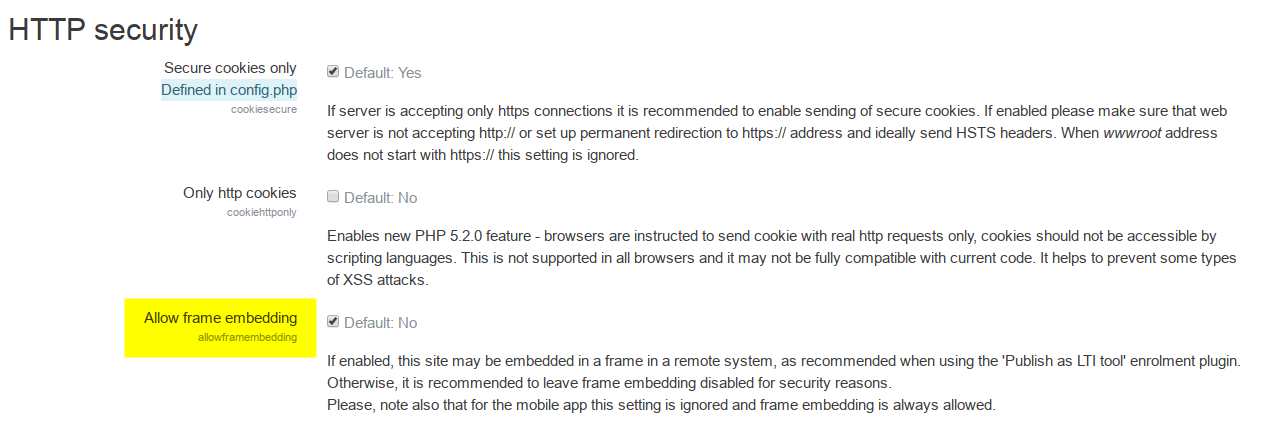
Since the proctoring system uses an iFrame to display quizzes, you should allow it in your Moodle settings. In order to display the Moodle page in an iFrame, the option "Administration" → "Security" → "HTTP Security" → "Allow frame embedding" must be enabled by a user with the "Administrator" role:
2.2. Add auto-session closure HTML
By default, the proctoring session is terminated by using the "Finish" button in the proctoring menu when the "finish" add-on is enabled. This termination is not associated with the completion of the quiz. However, you can set up a proctoring session that ends automatically when a quiz is completed in Moodle.
To set up automatic session termination, add the following code to the "Administration" → "Appearance" → "Additional HTML" → "When BODY is opened (or closed)" field in the Moodle setting:

<script>
  if (window.parent !== window.self) {
    const { pathname, search } = location;
    if (pathname.endsWith('/mod/quiz/review.php') ||
      (pathname.endsWith('/mod/assign/view.php') &&
        search.includes('action=view'))
    ) {
      window.parent.postMessage({ type: 'supervisor', command: 'stop' }, '*');
    }
  }
</script>
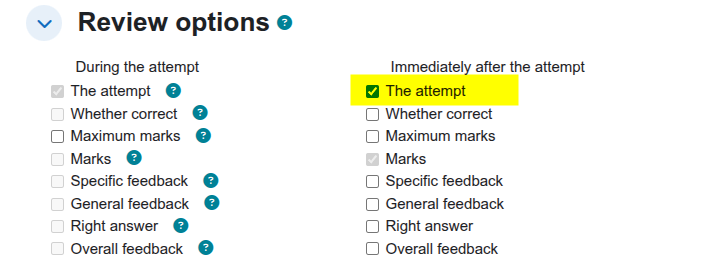
This code will automatically terminate the proctoring session once the attempt view page opens after the quiz is finished. This page must be enabled in the quiz element settings: "Review options" → "Immediately after the attempt" → "The attempt".
2.3. Set up the external tool
A user with the "Administrator" role should add a new external tool. You will use this tool to add the proctoring procedure to the quizzes in your course. There are several ways you can do it, but you should choose only one.
2.3.1. Using LTI 1.0/1.1
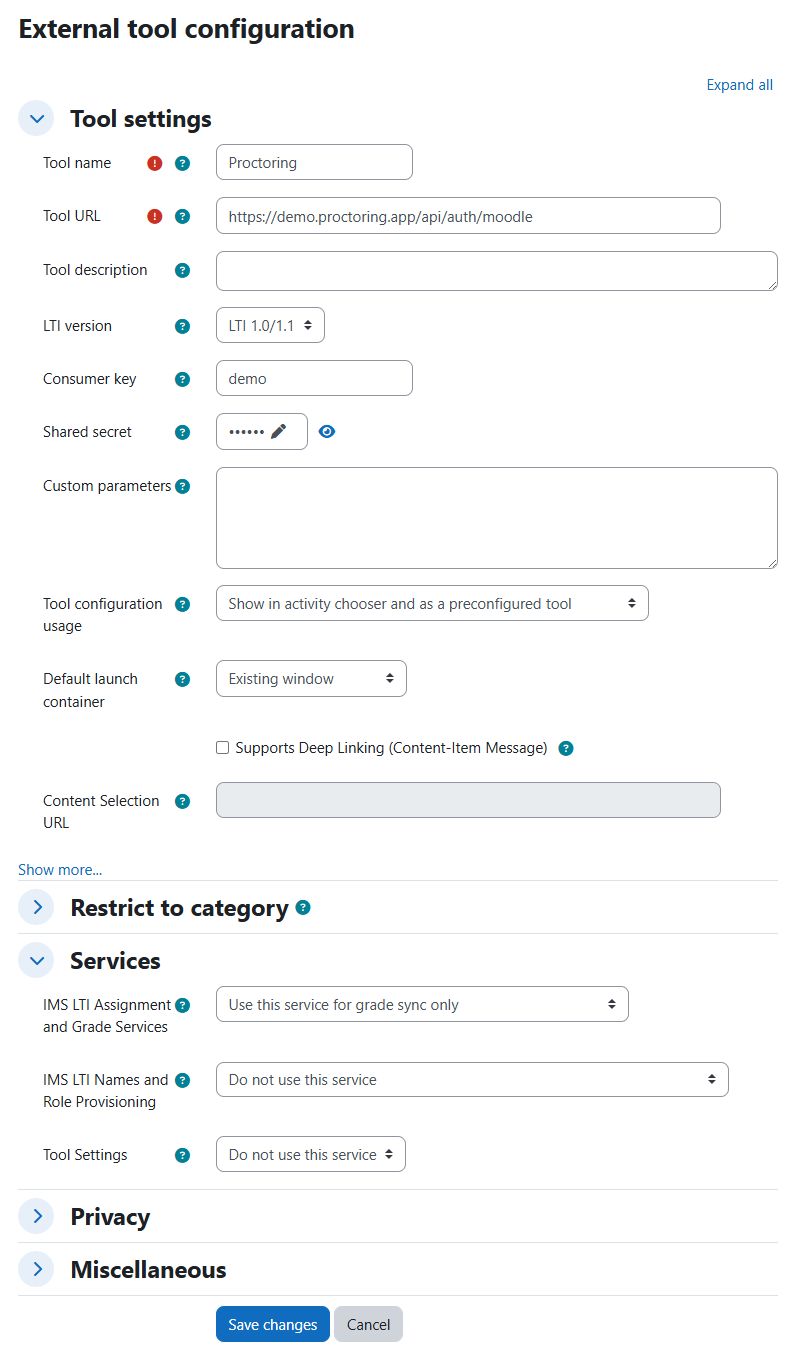
You need to go to the "configure a tool manually" link in the "Site administration" → "Plugins" → "Activity modules" → "External tool" → "Manage tools" section. The following parameters need to be specified there:
| Parameter | Value |
|---|---|
| Tool name | Proctoring |
| Tool URL | https://demo.proctoring.app/api/auth/moodle the "demo.proctoring.app" domain is used as an example only, please specify the address of your proctoring host instead |
| LTI version | LTI 1.0/1.1 |
| Consumer key | demo this key for your proctoring host is issued by the manager |
| Shared secret | secret this key for your proctoring host is issued by the manager |
| Tool configuration usage | Show in activity chooser and as a preconfigured tool |
| Default launch container | Existing window |
| LTI Assignment and Grade Services | Use this service for grade sync only |
| Privacy → Share launcher's name with tool | Always |
2.3.2. Using LTI 1.3
First, the manager must create the integration provider on your proctoring server (see Section 5) with the lti13 strategy, the issuer parameter set to the address of your Moodle site (the platform ID) and the clientId parameter left empty: the dynamic registration works only for such a provider. Then you need to get the URL for the tool related to this provider. This link should look like: https://demo.proctoring.app/api/auth/moodle_lti13. In this example, "demo.proctoring.app" represents your proctoring server domain, and "moodle_lti13" represents the provider name for this integration.
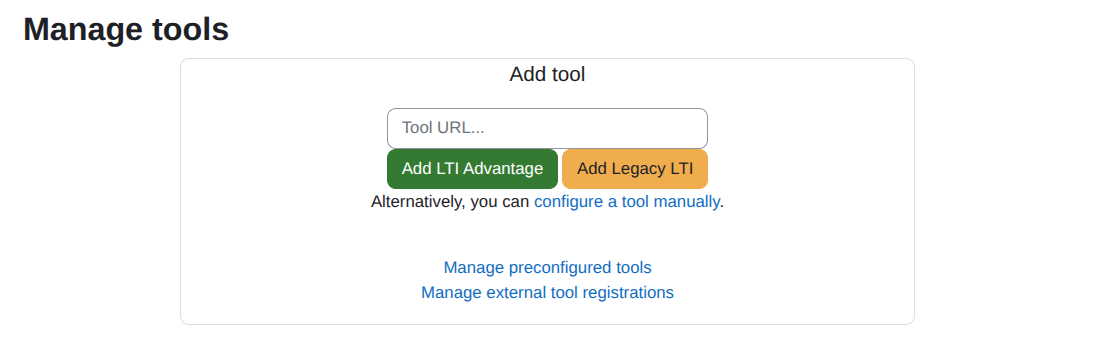
Next, you should put this link in the "Site administration" → "Plugins" → "Activity modules" → "External tool" → "Manage tools" section:
Then, follow these steps:
- Click "Add LTI Advantage". If prompted, select "Register as a new external tool".
- Once the tool appears in the list under the name "Proctoring" with an "Activate" button, click the pencil icon to edit the tool settings.
- Change the following parameters:
- Tool configuration usage: Select "Show in activity chooser and as a preconfigured tool"
- Default launch container: Select "Existing window"
- Click "Save changes".
- Click the "Activate" button on the tool's card to complete the registration.
After completing these steps, click the magnifying glass icon on the tool card to view the tool configuration details:
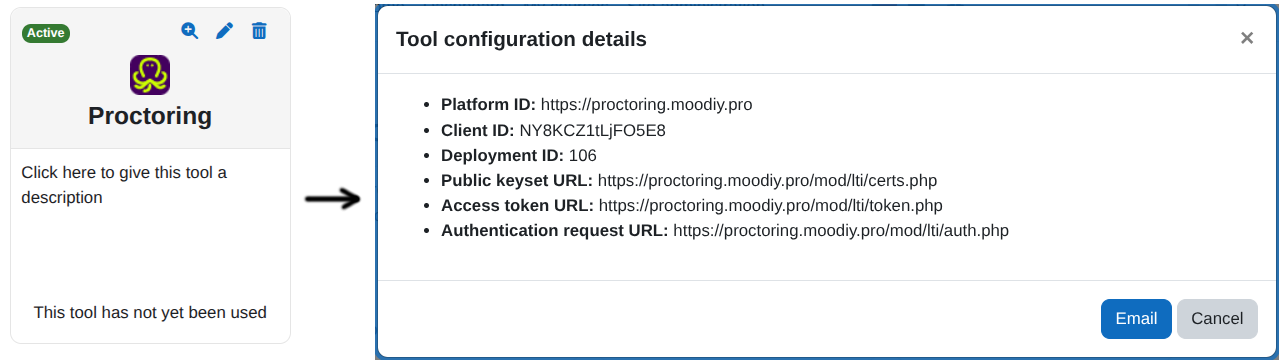
The registration saves the client ID into the clientId parameter of the provider automatically. You should use the other parameters (the keyset, token and authentication URLs) to complete the integration provider on your proctoring host by the manager. If you need to register the tool again, the manager must clear the clientId parameter first.
3. Setting up course elements
3.1. Create a quiz element
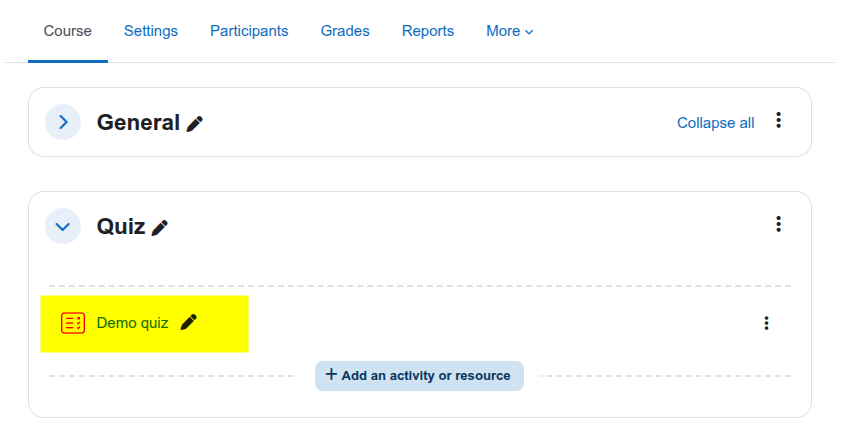
First, create a new quiz or move an existing one to a separate section of your course. This requires switching on edit mode in the course.
3.2. Set up the quiz element
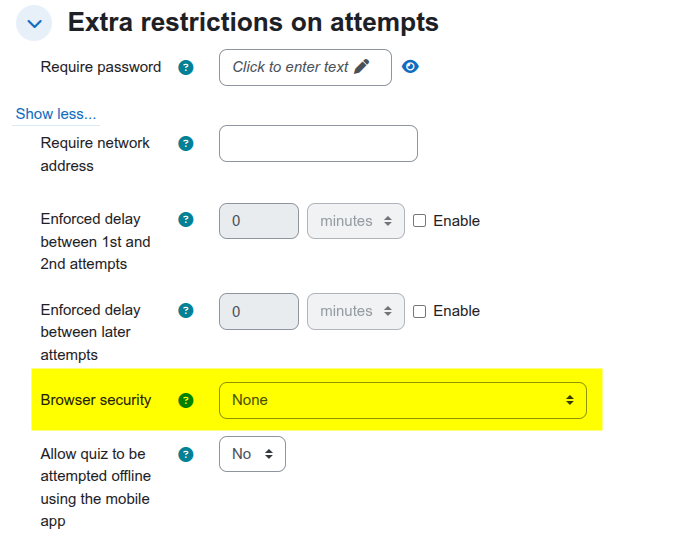
In the settings of the quiz element find "Extra restrictions on attempts" → "Browser security". Set it to "None". Otherwise, Moodle will open the quiz in a new window, which is blocked by iFrame.
You can set up the proctoring session to end automatically when the quiz is finished. To do so, enable this option in the quiz element settings: "Review options" → "Immediately after the attempt" → "The attempt".
3.3. Hide the quiz element
To prevent participants from opening the quiz in any way other than via a proctoring session, hide the quiz element from the course page while still allowing access to it. To do so, hide the section containing the quiz:
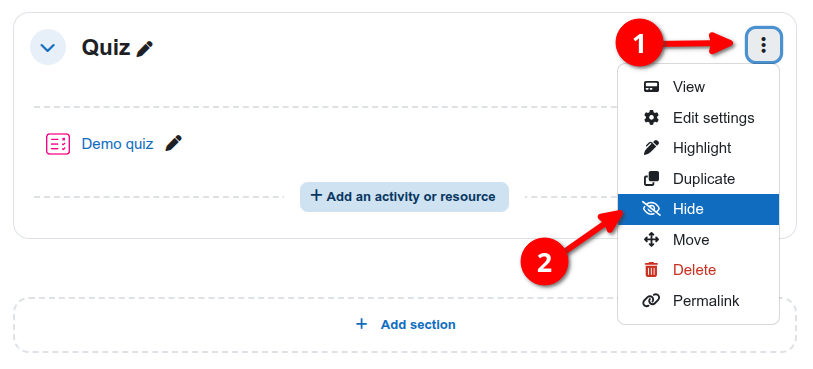
Then, make the quiz available via a direct link that opens the quiz during the proctoring session:
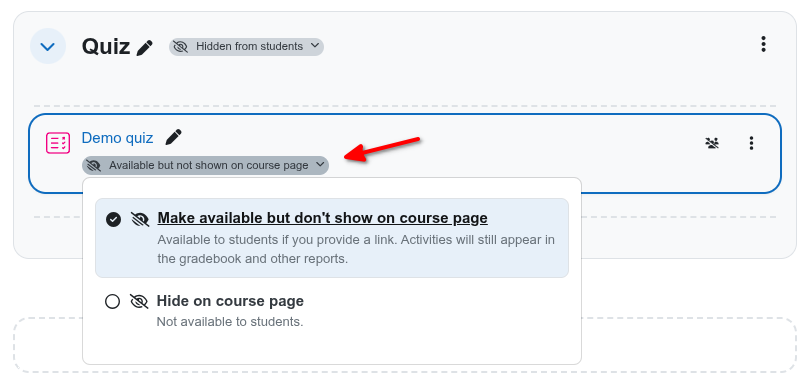
NOTE: If there is no 'Make available but don't show on course page' option, go to Site administration → Advanced features and enable 'Allow stealth activities (allowstealth)'
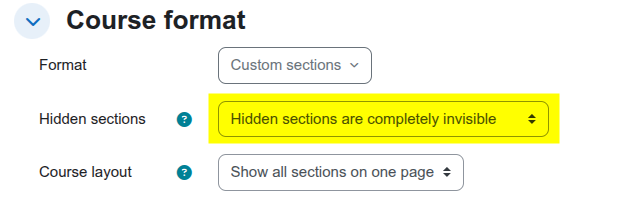
To hide this section completely, select the following: "Course settings" → "Course format" → "Hidden sections" → "Hidden sections are completely invisible":
3.4. Get a link to the quiz element
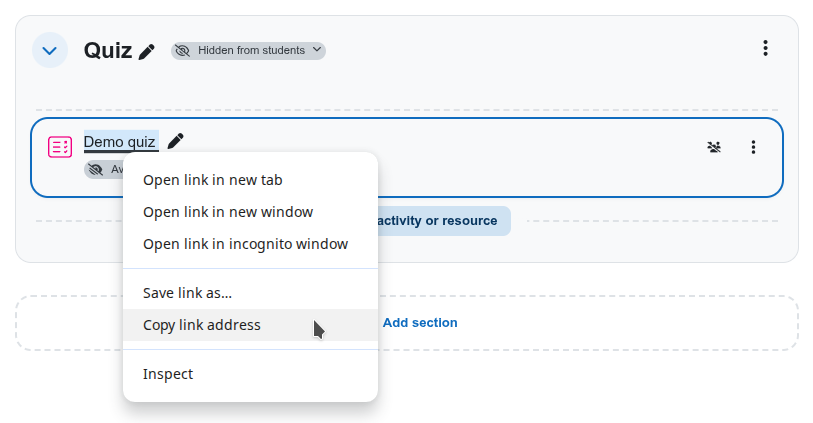
You should find the quiz element in the course, right-click on it and select "Copy link address". This link will be necessary when setting up the proctoring element.
3.5. Add a proctoring element
3.5.1 Using LTI 1.0/1.1
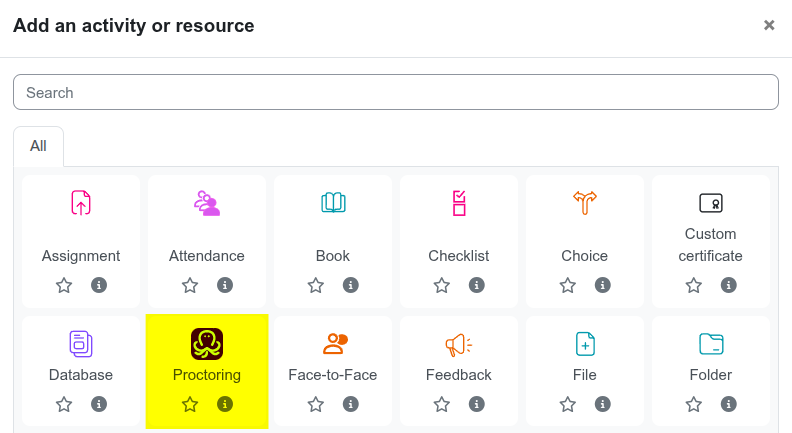
For each quiz element for which you want to enable proctoring, you need to add a new "Proctoring" element, which was created by the administrator beforehand. To do that, create a separate section and click the "Add an activity or resource" link:

In the shown dialog, select the "Proctoring" tool from the list:
After selecting an external tool, you will be prompted to enter the name of the course element. This name will appear in both Moodle and the proctoring system.
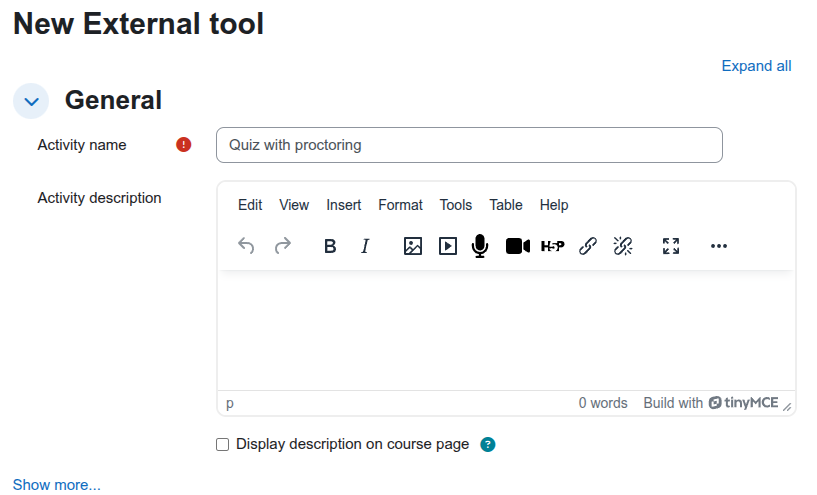
Click the "Save and return to course" button to save your changes.
3.5.2 Using LTI 1.3
If your integration utilizes LTI 1.3 standard, you can use the Deep Linking feature to configure the proctoring element. To do so, instead of saving immediately, use the "Select content" button.
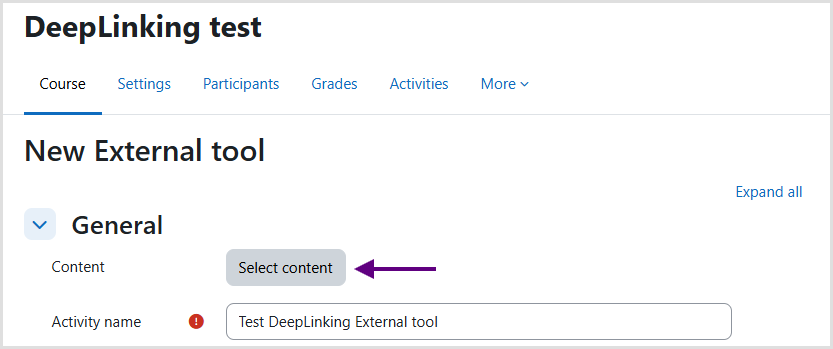
A Content Selector window will open, displaying the list of available proctoring templates and other parameters.
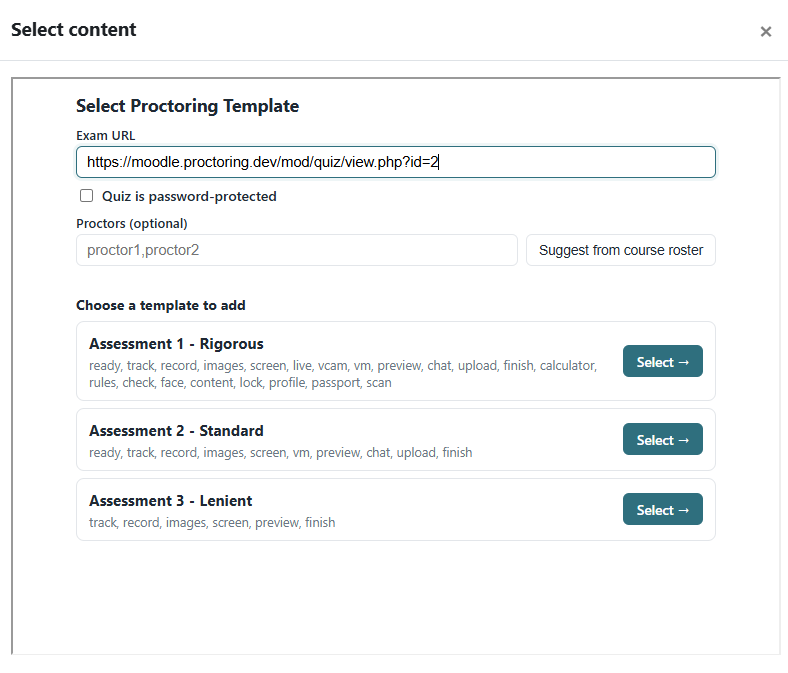
Specify quiz URL, select the necessary template, and you will be redirected to the course. The activity will be created automatically, and you do not need to manually fill in any custom parameters in section 3.6.
NOTE: The selector will only display assessments (templates) where the "Candidates" list is empty and the "Provider" field matches the provider name used in step 2.3.2 (by default it is moodle_lti13).
3.6. Set up the proctoring element (LTI 1.0/1.1 only)
Edit the proctoring element to change its settings. In the general session, click the "Show more..." link to display the "Custom parameters" field:
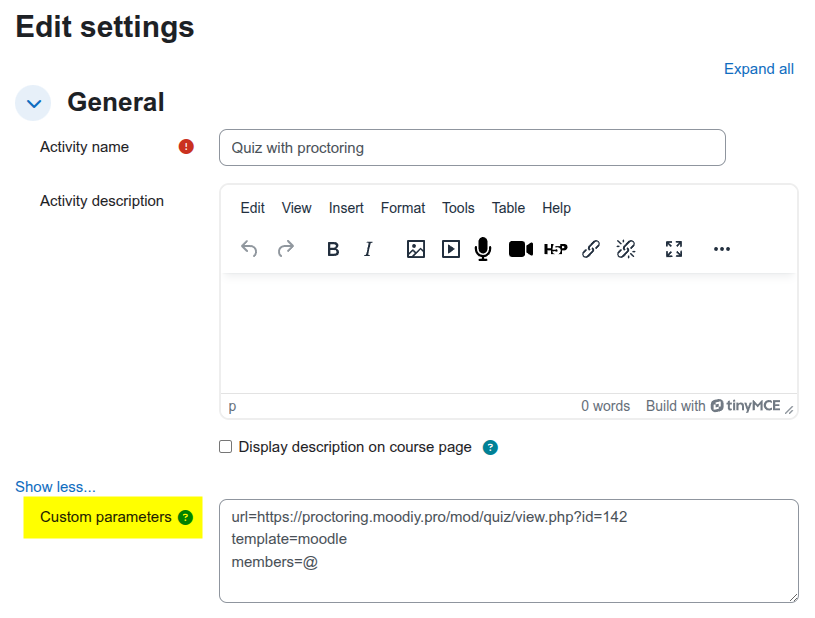
Configure the proctoring element by specifying the relevant parameters in the "Custom parameters" field in the format KEY=VALUE:
-
url=https://your-moodle-domain/mod/quiz/view.php?id=IDThis URL is a link to the quiz element that the proctoring system will open in an iFrame as soon as the session begins. If not specified, the course page where the proctoring element is located will open in an iFrame.
-
template=defaultYou need to specify an assessment (template) identifier from the "Identifier" field when creating proctoring sessions. If you do not specify a template, the template with the "default" identifier will be used. The settings in the specified template will be used to create an individual session for each test-taker. The template must be created in advance in the proctoring system by a user with the "Administrator" role.
-
members=@This is a list of proctor usernames (or user groups), delimited by commas. If the "@" symbol is specified, clicking on the proctoring element link will give the proctor access to all sessions created and passed through by participants on the same link.
You can manage the assignment of proctors to sessions through the "members" parameter in three ways:
-
members=@Moodle users with the "Teacher" role who are assigned to a course can log in to the proctoring system as proctors via the external tool in the course. These proctors can only observe or access session reports for participants who started a proctoring session through the same link.
-
members=id1,id2,...Only proctors with the listed usernames will have access to sessions started through this external tool in the course. The list of proctor usernames in the proctoring system is separated by commas. Proctors can be created either through the admin panel of the proctoring system or by selecting them as Moodle users with the "Teacher" role. In the latter case, the proctor's login will be their Moodle user ID.
-
the "members" parameter is not specified
The rules for assigning proctors to sessions are configured in the session template via the proctoring system's admin panel. You can specify a list of proctor usernames on the Members tab or define rules for assigning proctors from a list on the Invitations tab.
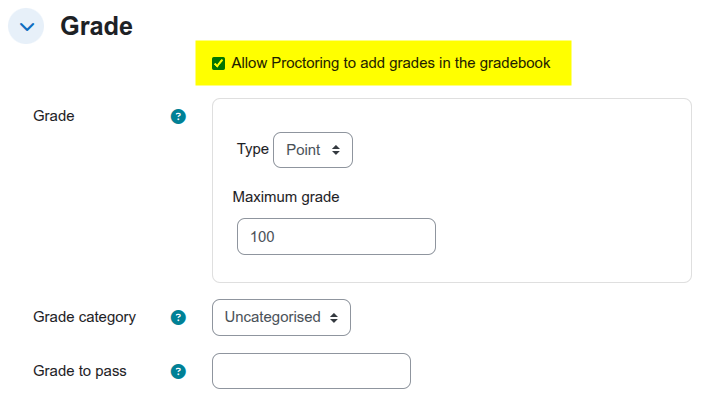
To display proctoring results in the Moodle gradebook, configure the grade settings for the proctoring element. Enable the "Allow […] to add grades in the gradebook" flag. If necessary, specify "Point" as the type and "100" as the maximum grade:
PLEASE NOTE:
- The keys are "url", "template" and "members" and the values are "https://your-moodle-domain/mod/quiz/view.php?id=ID", "default" and "@". All user parameters are optional; the proctoring session will run regardless of whether they are specified.
- If the preconfigured tool does not work properly, it is recommended that you delete it and set it up again.
- To test an external tool using a test-taker account, select the option in the top right corner: "Switch role to…" → "Student". Switch back to the admin account: "Return to my normal role".
3.7. Limit access to the quiz
The grade for the proctoring element is set at 0 immediately after the beginning of the proctoring session, and after completion, it is always greater than 0 (from 0.1 to 100 on a hundred-point scale). This can be used for access restrictions on the associated quiz element.
Open the quiz element settings and navigate to the "Restrict access" section. Add a new restriction by grade. Select the quiz and add the condition "must be < 0.1 %".
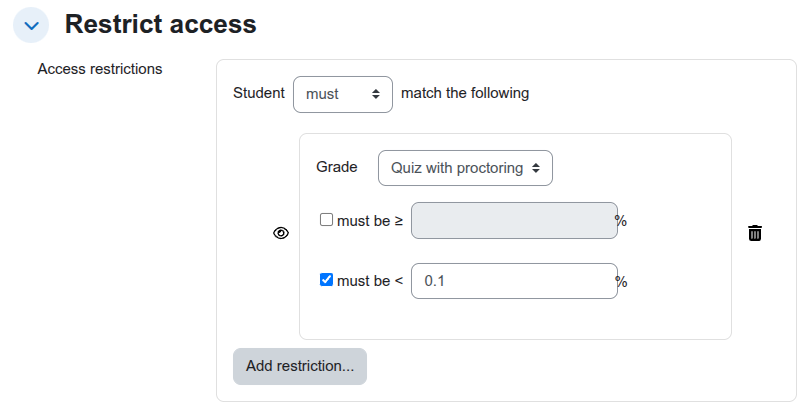
If you skip this step, the test-taker will be able to access the quiz through the direct link in their Moodle schedule without proctoring.
3.8. Outcomes and grades
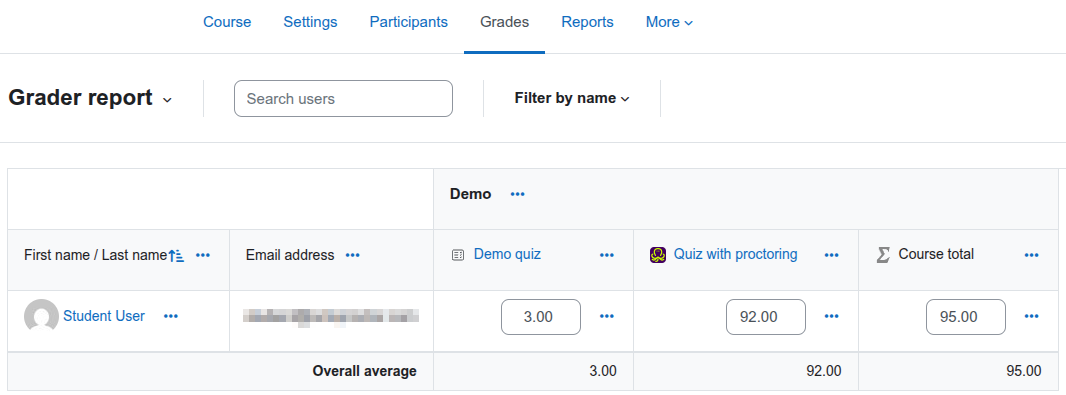
When a test-taker navigates to the proctoring element, they will begin taking the associated quiz according to the proctoring procedure. Clicking on a proctoring element takes the teacher or administrator to the proctor interface, where they can access all sessions created when the element was clicked.
After the proctoring session ends, the outcomes for each test-taker will be shown in the Moodle gradebook (see the Grades section). When the session conclusion is positive (set by the proctor, or automatically from the credibility score and the threshold of the session), the proctoring system sends a score of 100, or the grade of the quiz when the session uses the quiz player (the quiz add-on). Otherwise, if the conclusion is negative or there is none, it sends the minimum score of 0.1. The credibility score itself is not sent to Moodle.
3.9. Additional attempts
In order to allow test-takers to take the quiz multiple times until they pass, you need to:
-
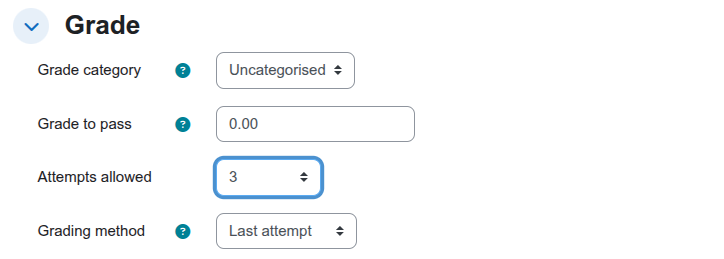
In Moodle, you can select the number of attempts in the quiz settings (up to the required number). To do so, go to the quiz settings and specify the number of attempts in the "Settings" → "Grade" → "Attempts allowed" field. You may also select "Unlimited" to allow an unlimited number of attempts to pass the quiz. It is also important to select "Last attempt" as the grading method for a better match with proctoring results. As shown in the screenshot below, each test-taker has three attempts at the quiz:
-
From the proctoring side, the administrator must assign a specific number of additional attempts. If this number is not defined, a test-taker will have one attempt to pass the quiz. As for the screenshot, a test-taker has three attempts (one main and two additional):
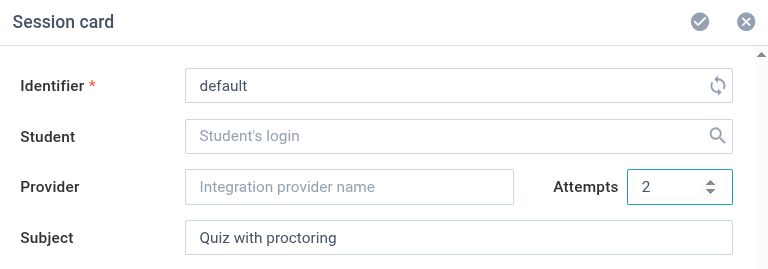
This setting is required on both the Moodle and proctoring sides. If "Unlimited" is selected in Moodle, you must define the number of attempts in the proctoring settings.
If a test-taker exceeds the allowed number of attempts during proctoring, you should update the test-taker's session created the first time rather than the template. This is because all changes made to a template are applied to newly created sessions, not current ones.
There are three options that allow the test-taker to take the session one more time:
- Add more attempts to the proctored session.
- Change the proctored session identifier.
- Delete the proctored session.
4. Troubleshooting
4.1. Invalid SSL certificate
In order for the system pages to open using the HTTPS protocol, a valid SSL certificate must be installed on the Moodle web server. You can verify the certificate's validity on your server using the SSLChecker.com service. This is a browser security policy requirement that prevents you from accessing the camera and microphone via an unprotected HTTP protocol. You can also issue a free Let's Encrypt SSL certificate.
4.2. Unsupported Moodle version
Since Chrome 80, the SameSite browser security policy has tightened, so by default, cookies are not sent when the page is opened in an IFRAME. Therefore, Moodle must be updated to version 3.5.11+, 3.6.9+, 3.7.5+, or 3.8.2 or higher, as the MDL-67175 correction was only made in these versions. A preconfigured version of the latest Moodle release is available on the Bitnami resource page.
If updating the Moodle version is not possible, you need to add a block of settings to the .htaccess file in the Moodle root directory on the server. These settings will change the web server's response headers through the mod_headers module for Apache:
<IfModule headers_module>
    Header edit Set-Cookie (.*) "$1; Secure; SameSite=none"
</IfModule>
The "headers" module must be included in Apache. To do so, use the a2enmod headers command.
4.3. Incorrect web server settings
A "Message signature not valid" or "Missing or invalid consumer key or access token" error may sometimes occur when submitting proctoring results to Moodle via the LTI outcome service. These errors are due to an incorrectly configured server.
It is important to set the time on the Moodle server correctly. Otherwise, OAuth authorization in LTI will not work.
This error may also be due to an inability to read the "Authorization" header in PHP. To resolve the issue, add the following rule to the Apache configuration file within the <VirtualHost :443> section associated with Moodle:
httpd.conf
SetEnvIf Authorization "(.*)" HTTP_AUTHORIZATION=$1
If this does not work, the Moodle forum recommends adding the following Apache mod_rewrite rule to the .htaccess file in the root Moodle directory of the server:
<IfModule rewrite_module>
    RewriteEngine On
    RewriteCond %{HTTP:Authorization} ^(.+)
    RewriteRule .* - [E=HTTP_AUTHORIZATION:%{HTTP:Authorization}]
</IfModule>
The "rewrite" module must be enabled in Apache. You can use the a2enmod rewrite command to do so. The Moodle directory must also support parameter overrides from the .htaccess file:
<Directory />
    AllowOverride All
    Options FollowSymLinks
</Directory>
4.4. Problems with the cross-domain policy
If you have trouble opening the quiz page in an iFrame during the proctoring session, place the WebSDK code on the Moodle domain and set up a redirect to the page after authorization via LTI. Once logged in, the user will be redirected to the Moodle page where the proctoring session will start using the WebSDK code. The proctoring-related quiz element will open in an iFrame.
You need to add a special JavaScript script to the "Administration" → "Appearance" → "Additional HTML" → "When BODY is opened (or closed)" field in the Moodle setting:
<script src="//demo.proctoring.app/sdk/supervisor.js" data-supervisor="sync"></script>
<script>
  if (window.supervisor) {
    supervisor.on('load', function (iframe) {
      const { pathname, search } = iframe.contentWindow.location;
      if (pathname.endsWith('/mod/quiz/review.php') ||
        (pathname.endsWith('/mod/assign/view.php') &&
          search.includes('action=view'))
      ) {
        supervisor.stop();
      }
    });
  }
</script>
where "demo.proctoring.app" is the domain of your proctoring server.
You also need to change the external tool setting by adding the "redirect" parameter to the tool URL so that it looks like this:
https://demo.proctoring.app/api/auth/moodle?redirect=https://your-moodle-domain/
Instead of "your-moodle-domain", use the actual domain of your Moodle server. Make sure that this page does not trigger any additional redirects. In some versions of Moodle, the homepage automatically forwards to https://your-moodle-domain/my/. If so, use this exact URL as the "redirect" parameter.
For LTI 1.3 integration, you should add the URL to all fields: Tool URL, Public keyset, Initiate login URL, and Redirection URI(s). Also, for LTI 1.3, use the "moodle_lti13" provider name or the provider name configured on your proctoring host instead of the "moodle" provider name.
5. Configuring the proctoring host
If you use the on-premises version of the OctoProctor system, you need to load the following configuration with integration parameters under the proctoring system manager to enable the LTI integration with Moodle.
{
  "id": "<Host_ID>",
  "key": "<License_Key>",
  "params": {
    "webhooks": {
      "moodle": {
        "strategy": "lti",
        "consumerKey": "demo",
        "consumerSecret": "secret",
        "callbackURL": "query.redirect",
        "profile": {
          "username": "payload.user_id",
          "role": "payload.roles.find(v => /Instructor/.test(v)) ? 'proctor' : 'student'",
          "nickname": "payload.lis_person_name_full",
          "lang": "(payload.launch_presentation_locale || '').slice(0, 2)",
          "group": "['G', payload.context_id, payload.resource_link_id].join('-')",
          "referrer": "payload.launch_presentation_return_url",
          "labels": "payload.lis_person_contact_email_primary"
        },
        "register": {
          "identifier": "[payload.user_id, payload.context_id, payload.resource_link_id].join('-').replace(/[^A-Za-z0-9_-]+/g, '_')",
          "template": "payload.custom_template || 'default'",
          "subject": "payload.resource_link_title",
          "members": "payload.custom_members === '@' ? user.group : payload.custom_members",
          "url": "payload.custom_url || payload.launch_presentation_return_url",
          "tags": "payload.lis_person_contact_email_primary",
          "code": "payload.custom_code"
        },
        "start": true,
        "stop": true,
        "pause": true,
        "submit": true
      },
      "moodle_lti13": {
        "strategy": "lti13",
        "callbackURL": "query.redirect",
        "clientId": "",
        "issuer": "<Platform_ID>",
        "privateKey": "<Private_Key>",
        "publicKeysetURL": "<Public_keyset_URL>",
        "accessTokenURL": "<Access_token_URL>",
        "authRequestURL": "<Authentication_request_URL>",
        "profile": {
          "username": "payload.sub",
          "role": "payload.roles.find(v => /Instructor/.test(v)) ? 'proctor' : 'student'",
          "nickname": "payload.name",
          "lang": "(payload.launch_presentation?.locale || '').slice(0, 2)",
          "group": "['G', payload.context?.id, payload.resource_link?.id].join('-')",
          "referrer": "payload.launch_presentation?.return_url",
          "labels": "payload.email"
        },
        "register": {
          "identifier": "[payload.sub, payload.context?.id, payload.resource_link?.id].join('-')",
          "template": "payload.custom?.template || 'default'",
          "subject": "payload.resource_link?.title",
          "members": "payload.custom?.members === '@' ? user.group : payload.custom?.members",
          "url": "payload.custom?.url || payload.launch_presentation?.return_url",
          "code": "payload.custom?.code"
        },
        "start": true,
        "stop": true,
        "pause": true,
        "submit": true
      }
    }
  }
}
NOTE: the "id" field is the ID of the host (if you do not specify it, a new host will be created); the "key" field is the license key of this host.
Configuration parameters:
"lti" strategy only
| Parameter | Value |
|---|---|
consumerKey |
LTI consumer key. |
consumerSecret |
LTI shared secret. |
"lti13" strategy only
| Parameter | Value |
|---|---|
issuer |
The address of the Moodle site (the platform ID). Required for the dynamic registration; if set, a launch from another issuer is refused. |
clientId |
LTI client ID. Leave it empty before the dynamic registration, which fills it in; enter it by hand for a manual registration. Optional: if set, it is checked against the launch. |
privateKey |
Private key in PKCS#8 format. |
publicKeysetURL |
URL to retrieve the platform's public keys. |
accessTokenURL |
URL to retrieve the platform's access token. |
authRequestURL |
URL to perform the authorization request to the platform. |
Here's how to create a private key for an LTI 1.3 configuration:
- Using an online tool:
- Navigate to https://jwkset.com/generate
- Select RSA with a key length of 2048 bits.
- Download the generated private key in PKCS#8 format (starting with "
-----BEGIN PRIVATE KEY-----").
- Using OpenSSL (recommended for security):
- Generate a private key:
openssl genrsa -out private.pem 2048 - Convert it to PKCS#8 format:
openssl pkcs8 -topk8 -inform PEM -outform PEM -nocrypt -in private.pem -out private.pk8
- Generate a private key: