Canvas LMS Integration Guide
1. How it works
The integration of the proctoring system with the Canvas LMS is done using the Learning Tools Interoperability (LTI) and the Supervisor SDK (JavaScript proctoring library). First, you need to place the custom SDK code on one of the HTML pages in the LMS, and then configure the LTI in the course module to access proctoring through the LMS.
2. Setting up a quiz element
Go to your course and open your quiz in preview mode. Copy the quiz URL from your browser's address bar to use later as the url custom parameter from Section 4.
To prevent the quiz from being opened without proctoring you should set up access restrictions to the quiz by code. To do this, you need to enable the "Access code required" option in the quiz element settings:
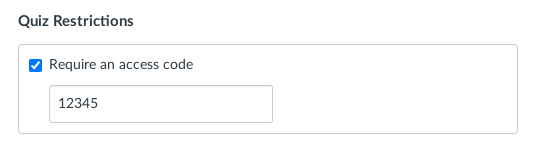
When running an assessment under proctoring, which is limited by an access code, the code will be automatically inserted into the input field and the participant will be able to start the assessment.
In addition, you can restrict access to the quiz without proctoring after the access code is entered correctly the first time. To do this, just add the word "proctoring" to the quiz title. Note that this only works if you upload the proctoring script using the Theme Editor (see Section 3.1).
"Only Once After Each Attempt" - If left unchecked, the test-takers will be able to see the Quiz Responses page in a multiple-attempt quiz after each attempt
3. Upload the proctoring script
For proctoring to work, you need to place the SDK code on the Canvas LMS page with the same domain as the quiz. This is required for opening the quiz in IFRAME within the proctoring session without cross-origin issues.
3.1. Using theme editor
You can use the Theme Editor in Canvas LMS to inject the proctoring code into all pages in the LMS. This method is described in this guide. To do this, follow these steps:
-
Create a
proctoring.jsfile on your computer with the following content:(function (host) { // the proctoring server adds "?proctoring=1" to the address of the page where it sends the test-taker var proctoring = new URLSearchParams(location.search).get('proctoring') === '1'; var isQuiz = /^\/courses\/\d+\/quizzes\/\d+/.test(location.pathname); if (window.self === window.parent) { // top-level if (window.ENV && window.ENV.current_user_id && isQuiz) { var title = document.getElementById('quiz_title'); if (title && /proctoring/i.test(title.textContent)) { var block = document.getElementById('quiz-instructions'); if (block) block.innerHTML = '<h1>This quiz requires proctoring. Please use the proctoring link from the course module to start the quiz.</h1>'; } } if (proctoring) { var script = document.createElement('script'); script.setAttribute('src', 'https://' + host + '/sdk/supervisor.js'); script.dataset.supervisor = 'sync'; document.head.appendChild(script); window.addEventListener('message', function (event) { if (event.origin !== location.origin) return; if (event.data && event.data.type === 'supervisor' && event.data.command === 'stop' && window.supervisor) { window.supervisor.stop(); } }); } } else { // iframe if (proctoring) { window.top.location.href = location.href; return; } if (isQuiz && !/\/take/.test(location.pathname)) { window.parent.postMessage({ type: 'supervisor', command: 'stop' }, '*'); } $(document).on('submit', function (e) { var form = e.target; if (/post/i.test(form.method)) { var url = new URL(form.action); if (url.host === host) return; var xhr = new XMLHttpRequest(); xhr.open('POST', form.action); xhr.addEventListener('load', function () { location.href = xhr.responseURL || url.searchParams.get('redirect') || location.href; }); xhr.send(new FormData(form)); e.preventDefault(); } }); } })('demo.proctoring.app');NOTE: you need to replace "demo.proctoring.app" with the domain of your proctoring server in the script code.
NOTE: the script starts the SDK only when the address has the
proctoring=1query parameter, so it does nothing on the other Canvas pages. The proctoring server adds this parameter to theredirectaddress (see thecallbackURLparameter in Section 7), and the SDK takes the session from the address and keeps it for the page reloads, so a reload resumes the session at any stage. The parameter disappears with the page when the session ends, because the SDK redirects the user away. If the user removes it from the address and reloads, the session is not resumed in that tab; the user has to open the proctoring link in Canvas again.NOTE: the script needs the new
callbackURLof the provider from Section 7. Update the host configuration first and the script second. An old script keeps working in between only with the token in thecallbackURL, as described in the next note.NOTE: a
proctoring.jsfrom an earlier version of this guide reads the token from the?token=query parameter instead. To keep such a script working until you replace it, add the token to thecallbackURLexpression of the provider (see "Support for an earlierproctoring.js" in Section 7). Replace the old script with the one above when you can. -
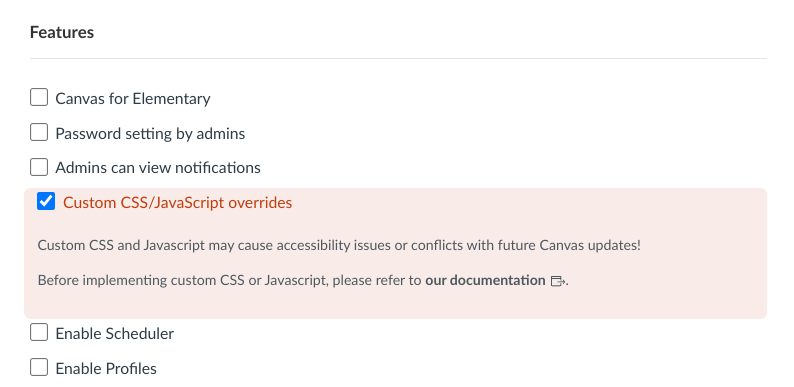
Enable the ability to load custom JavaScript in "Admin" → "Settings" → "Features" → "Custom CSS/JavaScript overrides".
-
Open the current theme in the theme editor "Admin" → "Themes" → "Open in Theme Editor" and upload the file
proctoring.js(Upload → JavaScript file)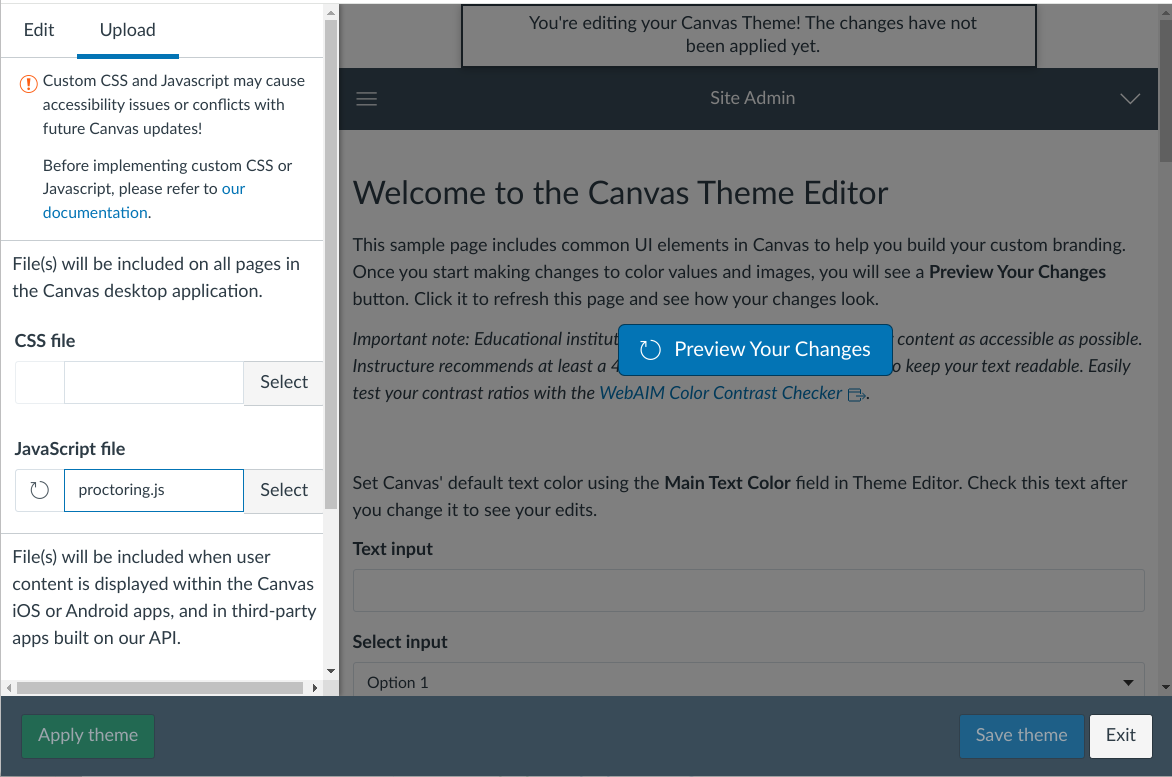
-
Save your changes by clicking the "Preview Your Changes", then the "Save theme" and "Apply theme" buttons
-
Use this URL in the Launch URL from Section 4 in the
redirectparameter:https://demo.proctoring.app/api/auth/canvas?redirect=https://your-canvas-serverNOTE: you need to replace
demo.proctoring.appwith the domain of your proctoring server andyour-canvas-serverwith your Canvas server domain.
3.2. Using file uploading
If the previous method does not work, you can upload the proctoring script as an HTML file and use a link to the file in the LTI Tool URL with the redirect parameter. To do this, follow these steps:
-
Create a
proctoring.htmlfile on your computer with the following content:<!DOCTYPE html> <html lang="en"> <head> <meta charset="utf-8"> <meta name="viewport" content="width=device-width, initial-scale=1"> <title>Proctoring</title> </head> <body> <p>There is nothing here. This is a service page for proctoring.</p> <script src="//demo.proctoring.app/sdk/supervisor.js" data-supervisor="sync"></script> <script> var host = 'demo.proctoring.app'; if (window.supervisor) { supervisor.on('load', function (iframe) { var { contentDocument, contentWindow } = iframe; var pathname = contentWindow.location.pathname; if (/^\/courses\/\d+\/quizzes\/\d+/.test(pathname) && !/\/take/.test(pathname)) { supervisor.stop(); return; } contentWindow.$(contentDocument).on('submit', function (e) { var form = e.target; if (/post/i.test(form.method)) { var action = form.action; var url = new URL(action); if (url.host === host) return; var xhr = new XMLHttpRequest(); xhr.open('POST', action); xhr.addEventListener('load', function () { contentWindow.location.href = xhr.responseURL || url.searchParams.get('next_question_path') || url.href; }); xhr.send(new FormData(form)); e.preventDefault(); } }); }); } </script> </body> </html>NOTE: you need to replace
demo.proctoring.appwith the domain of your proctoring server in the script code -
Go to the "Files" section of your course and upload the
proctoring.htmlfile. Then click on the uploaded file and copy the URL from your browser's address bar.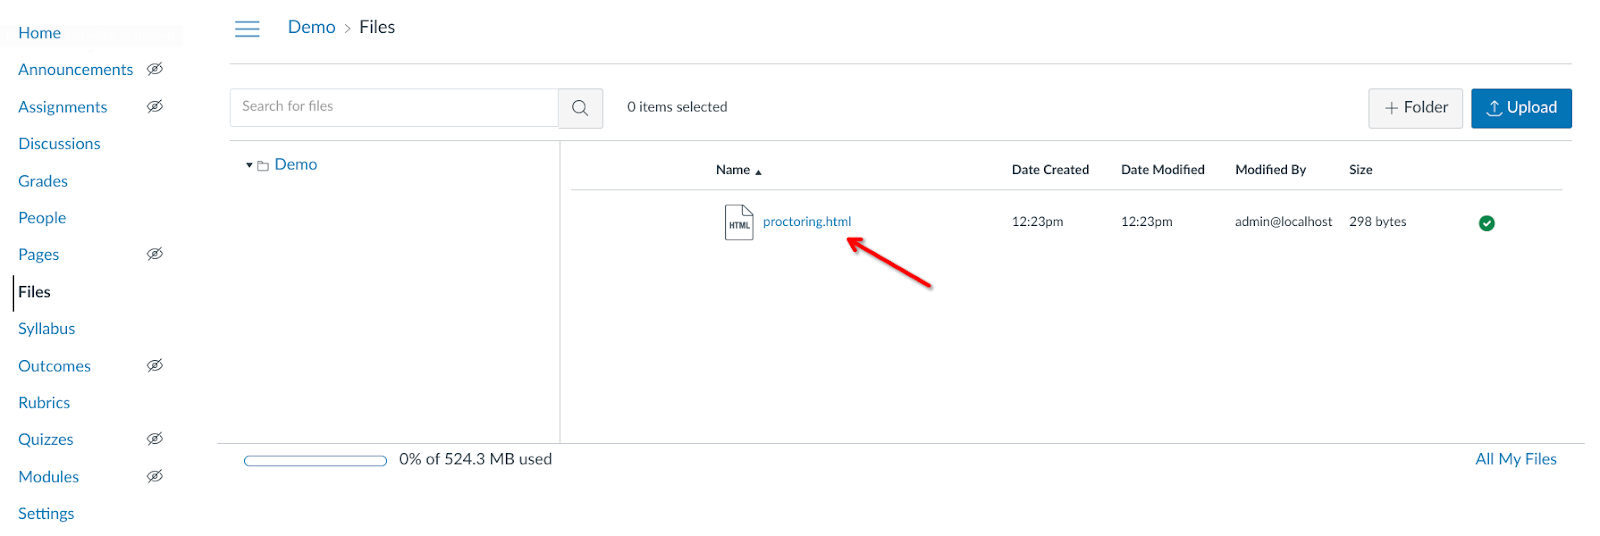
Example of the URL:
https://your-canvas-server/courses/1/files?preview=2 -
Replace the URL from the preview format to the standalone page format:
- Source URL:
/courses/<course_id>/files?preview=<file_id> - Target URL:
/courses/<course_id>/files/<file_id>/preview
- Source URL:
-
Use this URL in the Launch URL from Section 4 in the
redirectparameter:https://demo.proctoring.app/api/auth/canvas?redirect=https://your-canvas-server/courses/1/files/2/previewNOTE: you need to replace
demo.proctoring.appwith the domain of your proctoring server andyour-canvas-serverwith your Canvas server domain.
Sometimes it does not work because the domain for uploading files is different from the quiz domain (e.g. the Instructure.com cloud). In this case, you should try the next method.
4. Adding an application
4.1 Using LTI 1.1
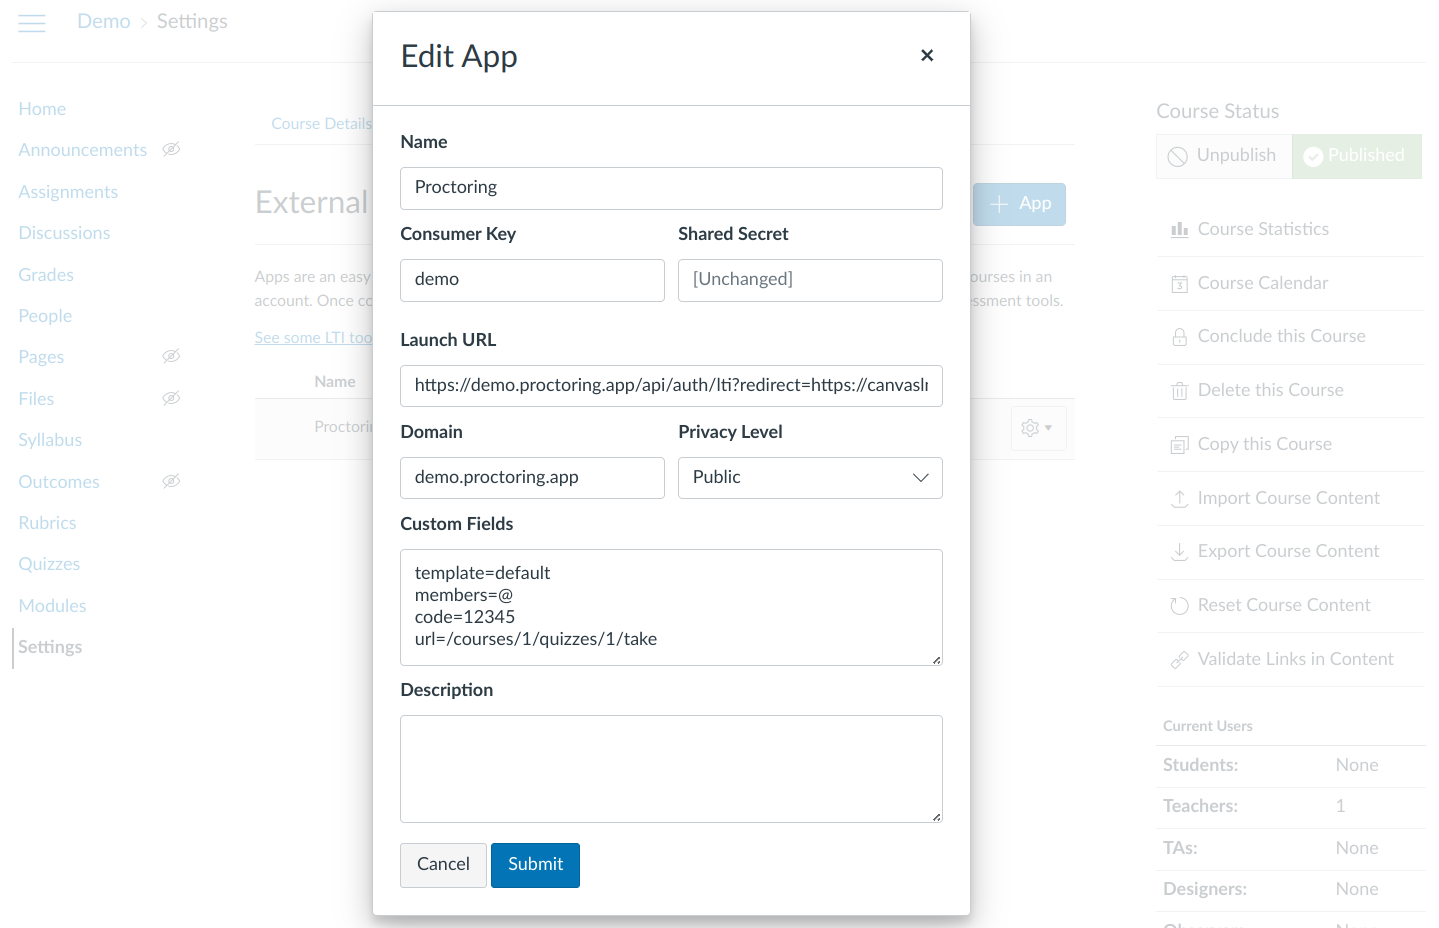
First, you need to add a new application to your course settings (or entire Canvas instance settings). To do this, go to "Settings" → "Apps" → "Add App" and in the window that opens, fill in the fields according to the following sample:
- Configuration type: Manual Entry
- Name: Proctoring
-
Consumer key:
demothis key for your proctoring server is issued by the manager
-
Shared secret:
secretthis key for your proctoring server is issued by the manager
-
Launch URL:
https://demo.proctoring.app/api/auth/canvas?redirect=<sdk_page>the
demo.proctoring.appis used as an example only, please specify the address of your proctoring server instead;<sdk_page>is a page with the proctoring script code, or the Canvas home page if you used the Theme Editor. If the address contains?,&,#or+, URL-encode it before inserting it, otherwise the parameter is cut or changed. -
Domain:
demo.proctoring.appthe
demo.proctoring.appis used as an example only, please specify the address of your proctoring server instead -
Privacy: Public
-
Custom fields:
Key Value templatedefaultmembers@url<quiz_url>code<quiz_password>
Colored fields should be replaced with your values. You can specify additional parameters in the KEY=VALUE format in the custom fields, if necessary. These are the parameters that will be sent to the proctoring system when the test-taker starts the application. In the url parameter you should specify the URL to the quiz in Canvas LMS in the format /courses/<course_id>/quizzes/<quiz_id>/take. In the code parameter you should specify the access code to the quiz.
4.2 Using LTI 1.3
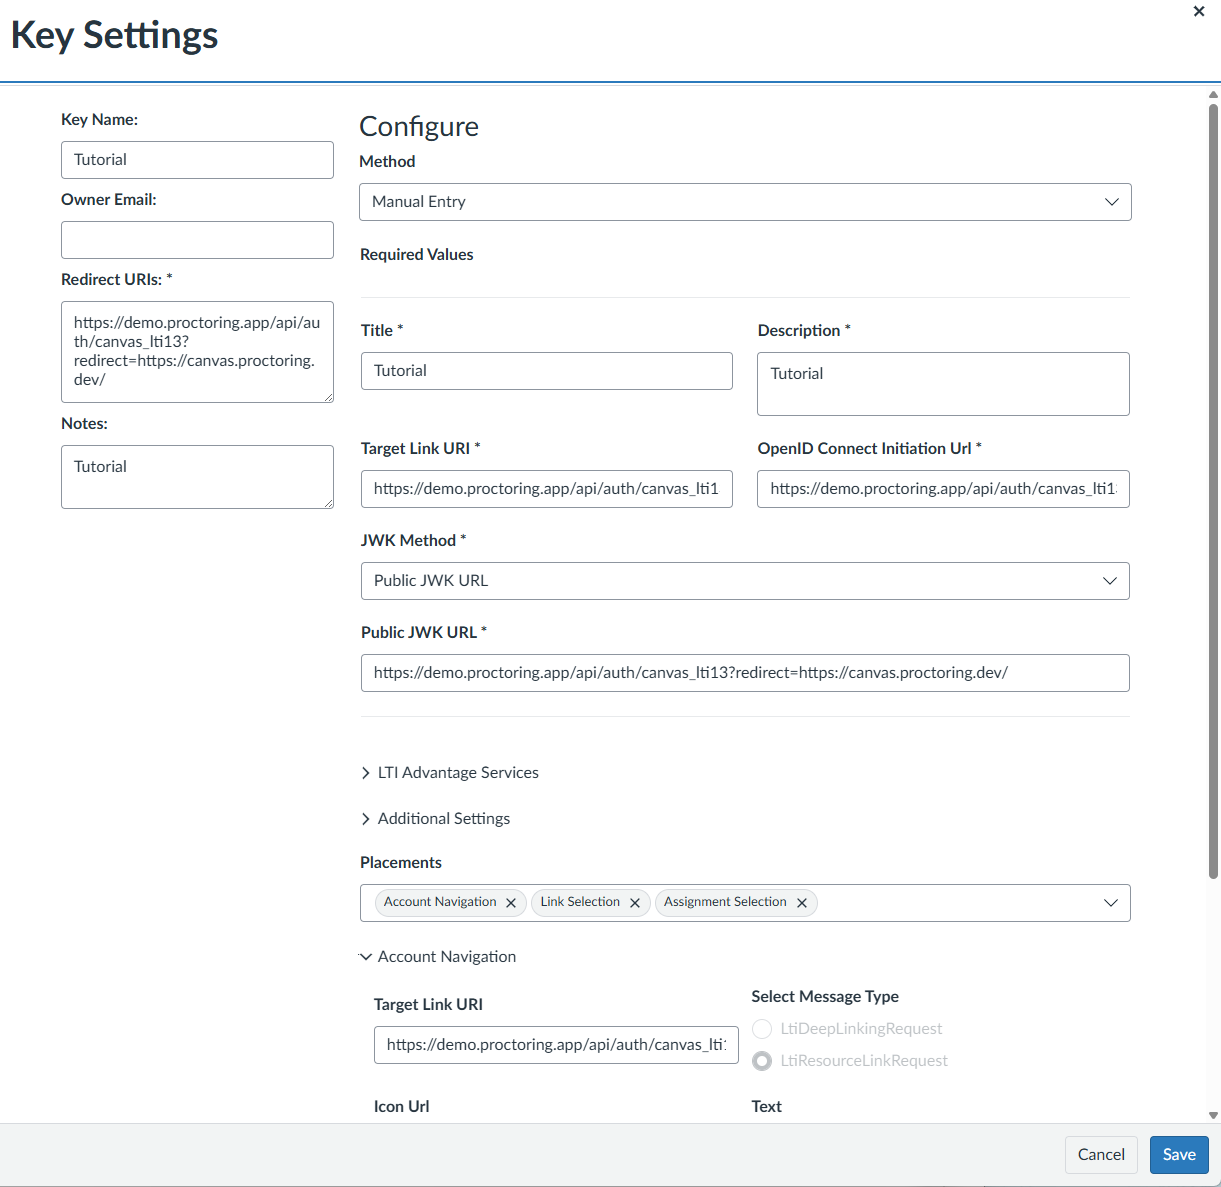
First, you should create the LTI developer key. Follow Admin → [your domain] → + Developer Keys → + Developer Key → LTI Key
Choose the value Manual entry from the Method drop-down list and fill in all the following fields:
- Key Name: A name for your Developer Key, e.g. Proctoring
- Title: A title for your Developer Key, e.g. Proctoring
- Description: A description for the Developer Key, e.g. OctoProctor Proctoring Key
- Redirect URIs:
https://demo.proctoring.app/api/auth/canvas_lti13?redirect=<sdk_page> - Target Link URI:
https://demo.proctoring.app/api/auth/canvas_lti13?redirect=<sdk_page> - OpenID Connect Initiation Url:
https://demo.proctoring.app/api/auth/canvas_lti13?redirect=<sdk_page> - JWK Method: Public JWK URL
- Public JWK URL:
https://demo.proctoring.app/api/auth/canvas_lti13?redirect=<sdk_page>
NOTE: the
demo.proctoring.appis used as an example only, please specify the address of your proctoring server instead;<sdk_page>is a page with the proctoring script code, or the Canvas home page if you used the Theme Editor. If the address contains?,&,#or+, URL-encode it before inserting it, otherwise the parameter is cut or changed.
From the LTI Advantage services drop-down list choose:
- Can create and view assignment data in the gradebook associated with the tool.
- Can view assignment data in the gradebook associated with the tool.
- Can create and update submission results for assignments associated with the tool.
- Can retrieve user data associated with the context the tool is installed in.
In Placements menu choose: Account navigation, Link Selection and Assignment Selection. Then, fill in the corresponding drop-down menus below:
- Target Link URI:
https://demo.proctoring.app/api/auth/canvas_lti13?redirect=<sdk_page> - Text: Proctoring
To enable the Deep Linking feature, make sure to select the LtiDeepLinkingRequest radio button under the Link Selection drop-down menu.
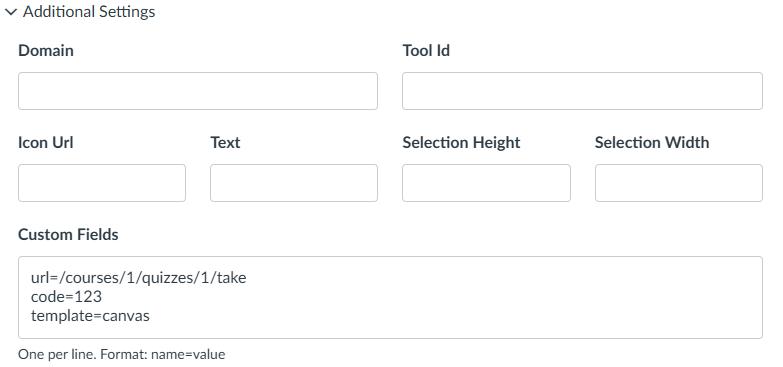
In the drop-down menu Additional settings you can fill in the Custom Fields with the following KEY=VALUE pairs:
- In the url parameter you should specify the URL to the quiz in Canvas LMS in the format
/courses/<course_id>/quizzes/<quiz_id>/take. - In the code parameter you should specify the access code to the quiz.
- Template parameter should contain a proctoring Assessment identifier.
However, if you enabled the Deep Linking feature by selecting the LtiDeepLinkingRequest option, you do not need to fill in these Custom Fields manually. The Content Selector will automatically pass the correct template ID and other necessary parameters during the setup.
| Key | Value |
|---|---|
template |
default |
url |
<quiz_url> |
code |
<quiz_password> |
members |
@ |
For example:
template=default
url=/courses/1/quizzes/1/take
code=12345
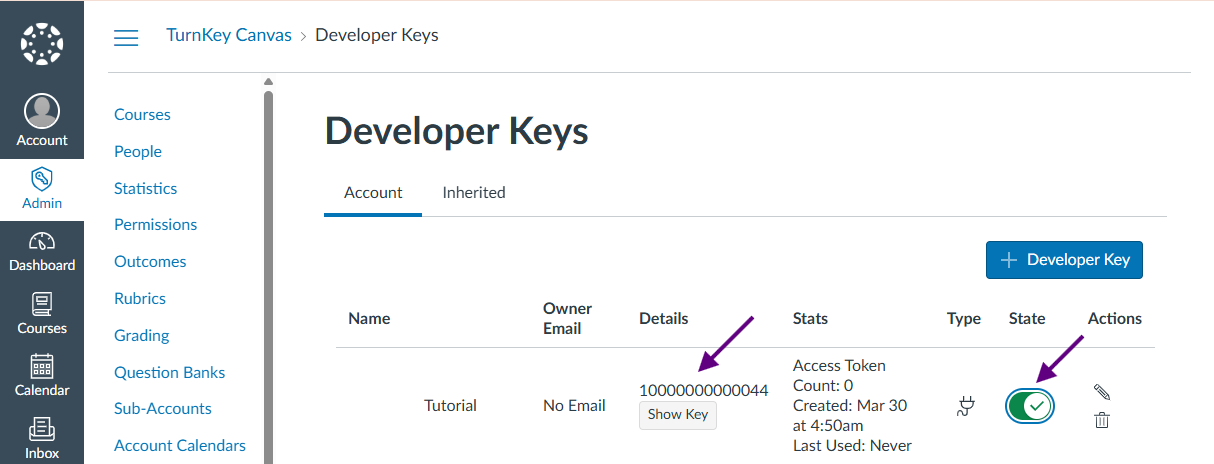
Save the Key.
Enable the created key (State) and copy its Client ID (Details).
5. Adding an external tool
5.1. Using LTI 1.1
For grade delivery from OctoProctor to Canvas to work, the external tool must be added specifically to your course's Assignments section.
Go to Your course → Assignments → + Assignment
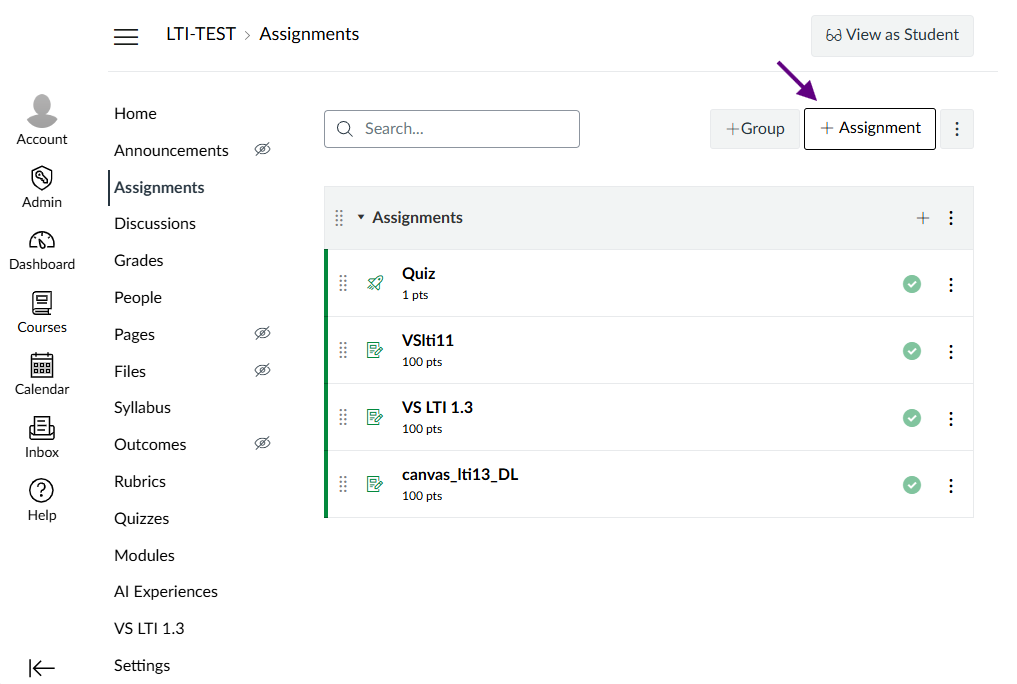
Then configure the following:
- Assignment Name — The name of the tool as it will be displayed in Assignments.
- Points — 100
- Display Grade as — Points
- Submission Type — External Tool
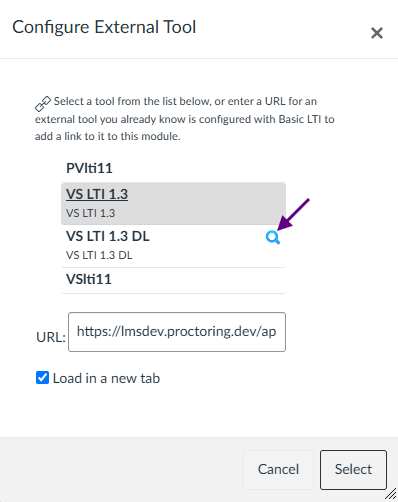
In the "Enter or find an External Tool URL" field, type the name of the application you added in Step 4 (the search is flexible). Select your tool from the list, and its address will appear in the URL field.
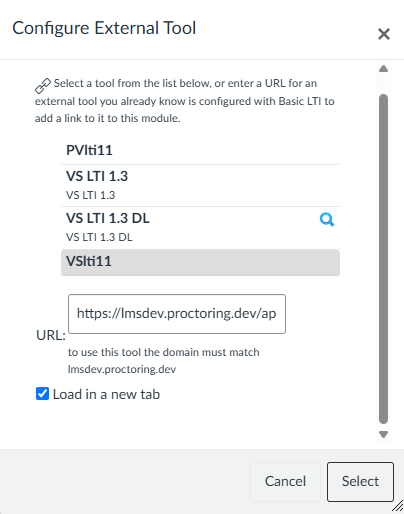
Make sure to check the "Load in a new tab" checkbox, then click "Select".
Click "Save and publish" to publish quiz and the entire module
5.2. Using LTI 1.3
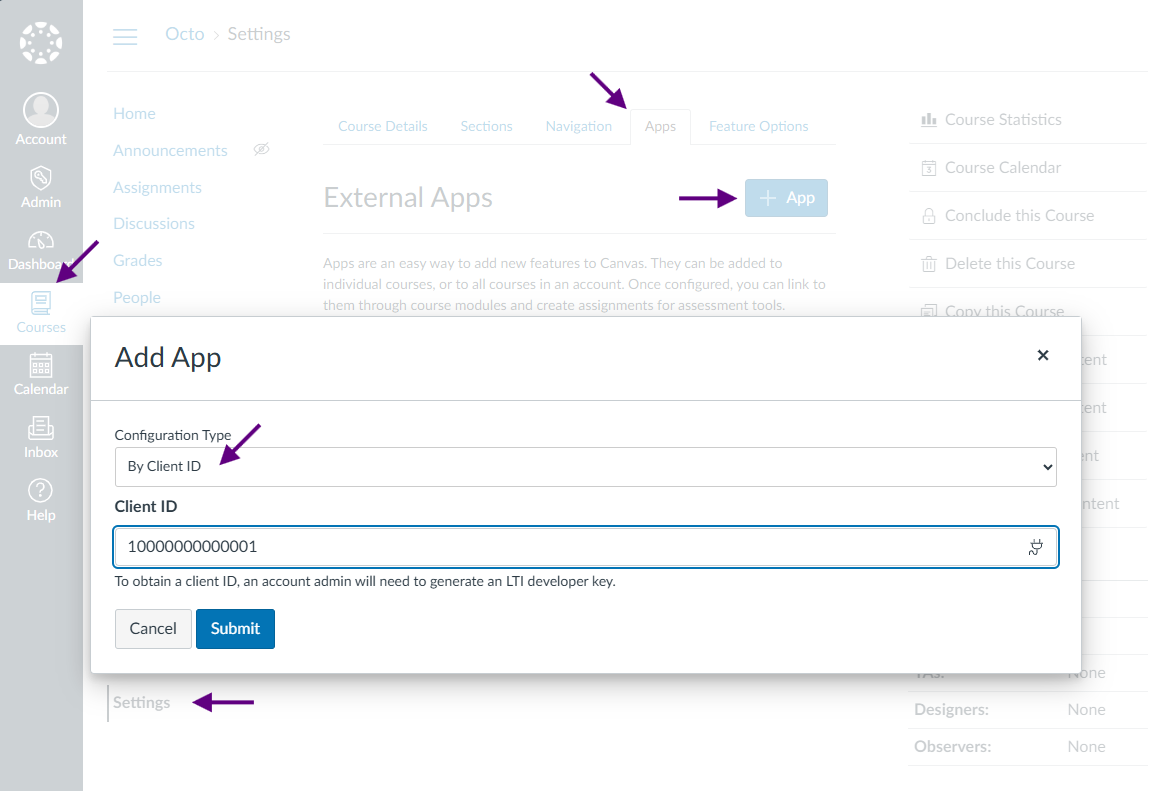
Open the course for which proctoring is needed.
Choose the Settings tab in the lower left part of the menu, then choose the Apps tab in the top part of the menu. To Add the app click +App button
- Configuration type: By Client ID
- Client ID: Paste the Client ID copied at the step 4.2
-
Click Submit → Install
Return to Your course → Assignments → + Assignment
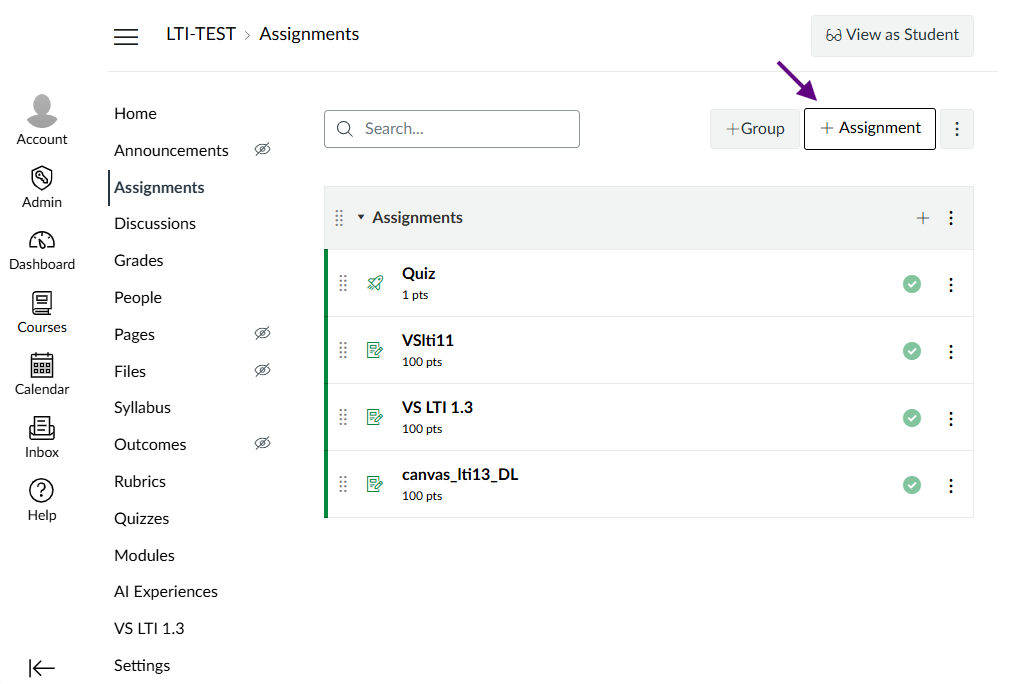
and configure the following:
- Assignment Name — The name of the tool as it will be displayed in Assignments.
- Points — 100
- Display Grade as — Points
- Submission Type — External Tool
In the "Enter or find an External Tool URL" field, type the name of the application you added in Step 4 (the search is flexible). Select your tool from the list, and its address will appear in the URL field.
Make sure to check the "Load in a new tab" checkbox, then click "Select".
Click "Save and publish".
If you are using the LTI 1.3 integration with the Deep Linking feature enabled, a Content Selector window will open if you click the magnifying glass icon.
The list of available proctoring templates and other parameters will be displayed, both in format and content entirely corresponding to the Custom Fields described in section 4.2.
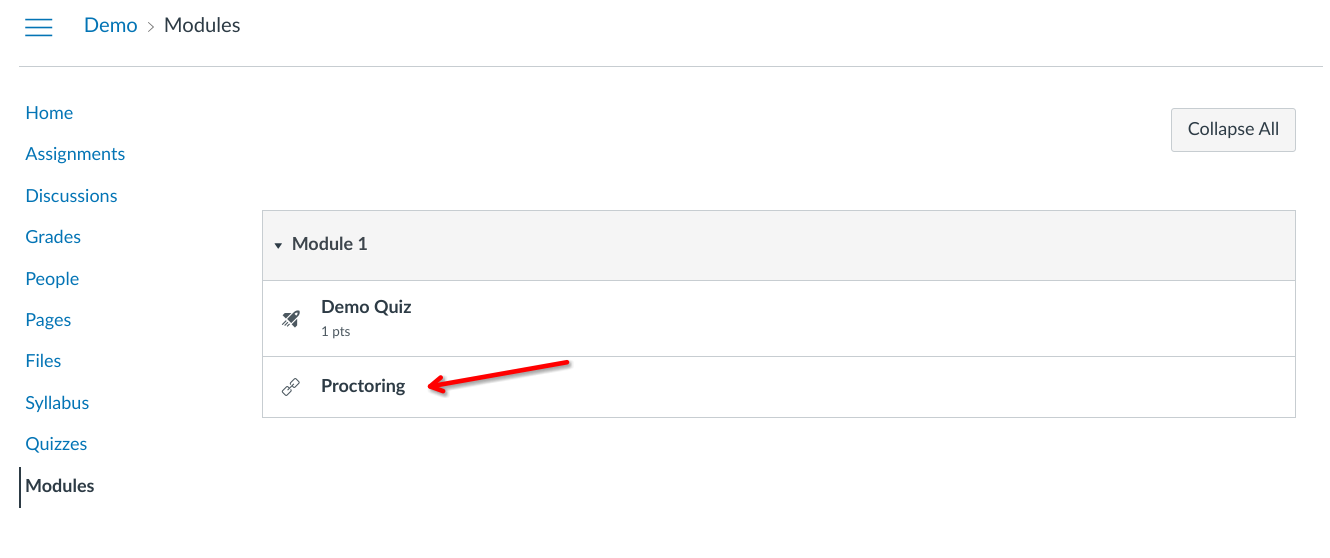
Select the necessary Assessment, then you will be redirected to the LMS with the module item automatically created.
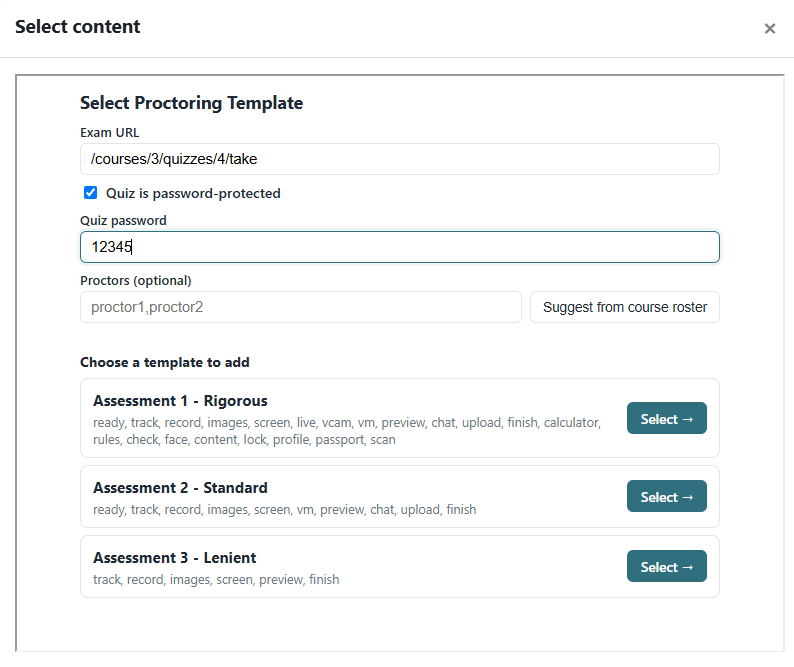
NOTE: The selector will only display those assessments (templates) where the "Candidates" field is empty and the "provider" field matches your configured provider name or is empty.
6. Use of proctoring
Now, when a test-taker navigates through the proctoring link, they will begin to take an associated quiz according to the proctoring workflow.
Clicking on the proctoring link takes an administrator or teacher to the proctoring interface, where they can access all sessions and their reports created by that link.
7. Setting up the proctoring host
To connect the integration API with Canvas LMS, you need to load the following config with integration parameters under the proctoring system manager:
{
  "id": "<Host_ID>",
  "key": "<License_Key>",
  "params": {
    "webhooks": {
      "canvas": {
        "strategy": "lti",
        "consumerKey": "demo",
        "consumerSecret": "secret",
        "callbackURL": "query.redirect && (u => (u.searchParams.set('proctoring', '1'), u.href))(new URL(query.redirect))",
        "profile": {
          "username": "payload.user_id",
          "role": "payload.roles.find(v => /Instructor|Admin/.test(v)) ? 'proctor' : 'student'",
          "nickname": "payload.lis_person_name_full",
          "lang": "(payload.launch_presentation_locale || '').slice(0, 2)",
          "group": "['G', payload.context_id, payload.resource_link_id].join('-')",
          "referrer": "(query.url || payload.custom_url || payload.launch_presentation_return_url || '').replace(/([/]quizzes[/][0-9]+)[/]take.*$/, '$1')",
          "labels": "payload.lis_person_contact_email_primary"
        },
        "register": {
          "identifier": "[payload.user_id, payload.context_id, payload.resource_link_id].join('-').replace(/[^A-Za-z0-9_-]+/g, '_')",
          "template": "query.template || payload.custom_template || 'default'",
          "subject": "payload.resource_link_title",
          "members": "payload.custom_members === '@' ? user.group : payload.custom_members",
          "url": "query.url || payload.custom_url",
          "tags": "payload.lis_person_contact_email_primary",
          "code": "payload.custom_code"
        },
        "start": true,
        "stop": true,
        "pause": true,
        "submit": true
      },
      "canvas_lti13": {
        "strategy": "lti13",
        "callbackURL": "query.redirect && (u => (u.searchParams.set('proctoring', '1'), u.href))(new URL(query.redirect))",
        "clientId": "<clientId>",
        "issuer": "",
        "privateKey": "<Private_Key>",
        "publicKeysetURL": "<Public_keyset_URL>",
        "accessTokenURL": "<Access_token_URL>",
        "authRequestURL": "<Authentication_request_URL>",
        "profile": {
          "username": "payload.sub",
          "role": "payload.roles.find(v => /Instructor|Admin/.test(v)) ? 'proctor' : 'student'",
          "nickname": "payload.name",
          "labels": "payload.email",
          "lang": "(payload.launch_presentation?.locale || '').slice(0, 2)",
          "group": "['G', payload.context?.id, payload.resource_link?.id].join('-')",
          "referrer": "(payload.custom?.url || payload.launch_presentation?.return_url || '').replace(/([/]quizzes[/][0-9]+)[/]take.*$/, '$1')"
        },
        "register": {
          "identifier": "[payload.sub, payload.context?.id, payload.resource_link?.id].join('-')",
          "template": "payload.custom?.template || 'default'",
          "subject": "payload.resource_link?.title",
          "members": "payload.custom?.members === '@' ? user.group : payload.custom?.members",
          "url": "payload.custom?.url || payload.launch_presentation?.return_url",
          "tags": "payload.email",
          "code": "payload.custom?.code"
        },
        "start": true,
        "stop": true,
        "pause": true,
        "submit": true
      }
    }
  }
}
NOTE: the fields
consumerKeyandconsumerSecretneed to be replaced with a randomly generated sequence of characters (Latin letters of different case and numbers, the recommended length is 24 characters);idis the ID of the host (if you do not specify it, a new host will be created);keyis the license key of this host.
Configuration parameters:
Both strategies
| Parameter | Value |
|---|---|
callbackURL |
The page where the test-taker is sent after the sign-in: the address from the redirect parameter of the launch URL with proctoring=1 added to its query. The proctoring.js script from Section 3.1 starts the SDK on this page. |
"lti" strategy only
| Parameter | Value |
|---|---|
consumerKey |
LTI consumer key. |
consumerSecret |
LTI shared secret. |
"lti13" strategy only
| Parameter | Value |
|---|---|
clientId |
LTI client ID (required for Deep Linking). |
privateKey |
Private key in PKCS#8 format. |
publicKeysetURL |
URL to retrieve the platform's public keys. |
accessTokenURL |
URL to retrieve the platform's access token. |
authRequestURL |
URL to perform the authorization request to the platform. |
The clientId parameter can be found at: Your Canvas domain → Apps → Manage → click the App Name field
Here's how to create a private key for an LTI 1.3 configuration:
- Using an online tool:
- Navigate to https://jwkset.com/generate
- Select RSA with a key length of 2048 bits.
- Download the generated private key in PKCS#8 format (starting with
-----BEGIN PRIVATE KEY-----).
- Using OpenSSL (recommended for security):
- Generate a private key:
openssl genrsa -out private.pem 2048 - Convert it to PKCS#8 format:
openssl pkcs8 -topk8 -inform PEM -outform PEM -nocrypt -in private.pem -out private.pk8
- Generate a private key:
Support for an earlier proctoring.js
A proctoring.js installed from an earlier version of this guide reads the session token from the ?token= query parameter. The proctoring server no longer puts the token in the query, but the callbackURL expression can add it: it can read the session token from the token variable. For such a script, use this callbackURL in the canvas and canvas_lti13 providers instead of the one from the configuration above:
"callbackURL": "query.redirect && (u => (u.searchParams.set('proctoring', '1'), u.searchParams.set('token', token), u.href))(new URL(query.redirect))"
With the new proctoring.js from Section 3.1, you do not need u.searchParams.set('token', token), and you should remove it: the token in the query address is visible to the LMS server logs and is sent in the Referer header.